Last Updated: July 3, 2026

TL;DR: Drip acclimation slowly equalizes water chemistry between shipping water and your tank, preventing osmotic shock and pH crash that kill fish and shrimp during introduction. This guide covers drip rate targets, acclimation duration by species sensitivity, ammonia buildup in bags, and how a proper drip kit differs from a DIY airline setup.
Best Drip Acclimation Kit for Fish and Shrimp: Reduce Losses from New Arrivals
The transfer from shipping bag to display tank is statistically the highest-mortality moment for any aquatic animal in the hobby. The fish or shrimp has spent hours or days in a sealed bag where CO2 accumulates, pH drops, ammonia rises, and oxygen depletes. Suddenly exposing that animal to your tank water — even if your parameters are perfect — creates a rapid osmotic and chemical shift that its physiology may not tolerate. Drip acclimation is the methodical solution.
Quick answer: For most people in 2026, the best drip acclimation kit for fish and shrimp is the Hardy freshwater fish (tetras, danios) — our #1 rated choice. See the full ranked comparison, alternatives and buying advice below.
Top Drip Acclimation Kits


As an Amazon Associate we earn from qualifying purchases. Product prices and availability are accurate as of the date/time indicated.
As an Amazon Associate we earn from qualifying purchases. Product prices and availability are accurate as of the date/time indicated.


As an Amazon Associate we earn from qualifying purchases. Product prices and availability are accurate as of the date/time indicated.
The Chemistry Behind Drip Acclimation
Shipping bags accumulate CO2 from animal respiration. This CO2 dissolves into water, forming carbonic acid and depressing pH — a 24-hour shipped bag commonly reaches pH 6.8–7.2 even for fish that live in pH 8.2 reef tanks. At low pH, ammonia exists primarily as ammonium (NH4+), which is largely non-toxic. The moment you add high-pH tank water to the bag, ammonium converts rapidly to free ammonia (NH3), which is acutely toxic.
Drip acclimation addresses this by gradually raising the pH of the holding container over 30–90 minutes. As pH rises slowly, the ammonia conversion occurs at a manageable rate while the animal’s gill tissue adapts. Simultaneously, salinity, temperature, and hardness equalize, preventing osmotic stress. The result is a significantly more resilient animal at the time of introduction.
Drip Acclimation Parameters by Species
| Species Type | Drip Rate | Duration | Notes |
|---|---|---|---|
| Hardy freshwater fish (tetras, danios) | 2–3 drops/sec | 30–45 min | Float bag first for temp |
| Sensitive freshwater fish (discus, altum angels) | 1–2 drops/sec | 60–90 min | Cover container, low light |
| Neocaridina shrimp (cherry, snowball) | 1 drop/sec | 45–60 min | Never expose to copper |
| Caridina shrimp (crystal, Taiwan bee) | 1 drop/sec | 60–90 min | Most sensitive to pH/TDS swing |
| Hardy marine fish (clownfish, damsels) | 2–3 drops/sec | 45–60 min | Discard shipping water |
| Sensitive marine fish (mandarins, anthias) | 1–2 drops/sec | 60–90 min | Observe throughout |
| Invertebrates (snails, hermits) | 2 drops/sec | 30–45 min | Osmotic stress tolerance low |
| Corals | Not recommended | — | Float + brief dip preferred |
Drip Kit Components and What Matters
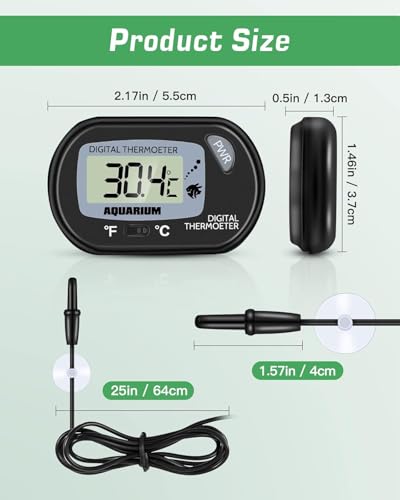
A purpose-built drip acclimation kit includes a flow control valve, tubing, and usually a clip to secure the drip source to the tank rim. The flow control valve is the critical component — cheap airline tubing tied in a loose knot is the DIY alternative, but knots shift position as the tubing absorbs water and warms, causing uncontrolled flow rate changes. A proper needle valve or adjustable clamp maintains a consistent drip rate for the entire acclimation period without adjustment.
The receiving container should be large enough that the drip volume doubles the original shipping water volume before you transfer the animal — this ensures sufficient parameter equalization. For shrimp acclimation specifically, a dark-colored or covered container reduces light-induced stress during the vulnerable transition period. A small air stone running in the acclimation container maintains dissolved oxygen, which drops quickly in a static container with a live animal.
Ammonia Detoxifier: An Essential Supplement
Adding a few drops of Prime or Seachem AmGuard to the shipping water immediately upon opening converts free ammonia to a non-toxic bound form, buying additional time during acclimation. This is especially valuable for fish that have been in transit more than 24 hours, where ammonia levels in the bag may be measurable. The detoxifier does not lower ammonia — it binds it temporarily, giving the animal’s physiology time to adjust as pH rises during acclimation.
After acclimation, net the animal and transfer it to the display tank without adding shipping water. Shipping water contains ammonia, pathogens, and potentially parasites — introducing it to your tank or quarantine system is always a risk. For saltwater arrivals especially, the shipping water may have significantly different salinity than your display; adding it can spike or dilute salinity in smaller tanks. Our fish quarantine tank setup guide covers the full new arrival protocol including observation period and prophylactic treatment options.
Shrimp-Specific Acclimation Considerations
Caridina shrimp (crystal red, Taiwan bee, shadow panda) are the most parameter-sensitive animals commonly kept in the freshwater hobby. They thrive in soft, acidic water — TDS 80–150 ppm, pH 5.8–6.8, GH 3–5, KH 0–2. Shipping water often deviates significantly from these targets depending on the seller’s source water. Any rapid TDS swing above 50 ppm or pH shift above 0.5 units can trigger a molting cascade (failed molts, bacterial infection, death) or cause direct osmotic shock.
For Caridina shrimp specifically: drip at the slowest rate comfortable for the holding container volume (1 drop per 2 seconds is not excessive), aim for 90–120 minutes total duration, and if TDS or pH are extremely mismatched between shipping water and display tank, consider an intermediate step where you acclimate to a middle-ground container first. Our complete freshwater shrimp tank setup guide covers parameter targets and substrate buffering in detail.
Frequently Asked Questions
Can I just float the bag for 15 minutes instead of drip acclimating?
Floating equalizes temperature but does nothing for salinity, pH, or water chemistry. For hardy fish with minimal parameter differences between shipping water and your tank, floating plus a brief bag opening to mix water is acceptable. For any shrimp, sensitive fish, or animals that have been in transit more than 12 hours, skipping drip acclimation significantly increases mortality risk. The 30–90 minutes required is a small investment given the cost of most aquatic livestock.
How do I drip acclimate into a tank with an active protein skimmer or strong flow?
Always drip into a separate container — bucket, specimen container, or bowl — not directly into the display tank or sump. The goal is to equalize parameters in an isolated environment before introducing the animal. Dripping into a sump with active flow will simply dilute shipping water instantly with no acclimation benefit, and the animal may be sucked toward pump intakes before you can net it out.
My shrimp survived drip acclimation but died 3–5 days later. What went wrong?
Delayed mortality 3–5 days after introduction is a classic sign of copper toxicity, failed molting (often from KH imbalance in Caridina tanks), or bacterial infection introduced with the animal. Check your tank for any trace of copper — pest treatments, fertilizers, and even some tap water sources contain copper lethal to shrimp at 0.02 ppm. Test KH and GH against your substrate’s buffering targets. If multiple shrimp died showing white or opaque bodies, bacterial Columnaris or Pseudomonas is likely. Review our fish disease treatment guide for diagnostic steps.
Do I need a separate drip acclimation kit for freshwater versus saltwater animals?
The same kit works for both — it is just tubing and a flow valve. However, cross-contaminate cautiously: if your drip kit has been used in a tank with marine ich (Cryptocaryon) or other marine pathogens, do not use it for freshwater animals without thorough cleaning. The same kit can also be used for both the temperature float phase and the drip phase — simply hang the outflow over the acclimation bucket after the temperature equalization period is complete.
What if I receive an animal late at night and I am too tired to monitor a 90-minute drip?
A valid concern for overnight shipments. In this situation, add an ammonia detoxifier to the bag water immediately upon opening, float the bag in the quarantine tank for temperature equalization, then set up a slow drip (1 drop per 2–3 seconds) with enough container volume that the animal is safe for 2–3 hours unattended. An air stone in the container maintains oxygen. Check at the end of the drip and transfer. For overnight shipping with dead-on-arrival risk already elevated, an extended slow drip is preferable to a rushed 15-minute acclimation at midnight. If you keep multiple tanks, having a dedicated nano quarantine tank running at all times eliminates the setup delay entirely.
Once acclimated and transferred, monitor new arrivals closely for the first week. Review our nitrogen cycle guide to ensure your quarantine tank is fully cycled before any fish or invertebrates are added — uncycled water compounds stress on newly arrived animals and dramatically increases mortality.
Ready to decide? Our #1 pick for 2026 is the Hardy freshwater fish (tetras, danios).
Live price & availability on Amazon.
Related Reviews & Guides


Quick Picks: Best Live Plants for Beginner Freshwater…

Best Betta Fish Aquarium Heater 2026