Last Updated: October 4, 2026
A noisy aquarium air pump is usually suffering from vibration, a restricted airflow path, a worn diaphragm, or water moving backward through the airline. The good news is that most fixes take only a few minutes and do not require replacing the entire setup. Before you begin, unplug the pump and keep its electrical plug, outlet, and power strip dry. Never open or adjust a powered pump near splashing water.
Fix the simplest causes first: stabilize the pump, inspect the tubing, clean the air stone, and check the valves. If you ignore a loud rattle, the pump may eventually lose airflow or overheat. If you force a blocked line, disconnect tubing while the pump is running, or let water reach the motor, you can damage the equipment and put your fish at risk. This guide explains how to fix a noisy aquarium air pump safely in 2026.
As an Amazon Associate we earn from qualifying purchases at no extra cost to you.

Quick answer: Our top pick in 2026 is the Clean towel or silicone mat — our #1 rated choice. See the full ranked comparison, alternatives and buying advice below.
What You Need
| Item | Why | Optional? |
|---|---|---|
| Clean towel or silicone mat | Absorbs vibration and prevents the pump from sliding | No |
| Spare airline tubing | Replaces tubing that is kinked, brittle, or clogged | Helpful |
| Air stone | A new stone can restore airflow when the old one is blocked | Helpful |
| Check valve | Stops aquarium water from flowing into the pump during an outage | Required if the pump sits below the waterline |
| Small bowl of aquarium water | Provides a safe place to rinse an air stone or connector | Optional |
| Replacement air pump | Useful if the diaphragm or motor has failed | Only if needed |
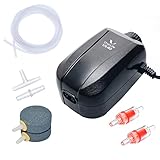
Complete kits can be economical when several parts are worn. For example, dual-outlet pumps such as the Uniclife 64 GPH model, rated for 10- to 100-gallon tanks, and the Pawfly 50 GPH model, rated for 10- to 60-gallon tanks, commonly sell in the roughly $10 to $15 range. A pump should match your aquarium size and the back pressure created by your air stones; do not choose solely by the lowest price.
Step-by-Step
1. Unplug the pump and identify the sound — 2 minutes
Disconnect the pump from power before touching the tubing or moving the unit. Listen to the noise before unplugging it, then identify whether it is a hum, buzz, rattle, clicking sound, or splashing noise.
A low hum that changes when you touch the pump often indicates vibration against a hard surface. A rattling or clicking sound can point to a loose cover, worn rubber foot, or failing diaphragm. A louder-than-usual hum with weak bubbles may indicate a clogged air stone or restricted line. If water is visible in the airline, stop using the pump until you inspect the setup.
2. Stabilize the pump on a soft, level surface — 3 minutes
Place the pump on a level surface with a towel, silicone mat, or several layers of firm foam underneath it. The pad should be stable rather than fluffy; excessive cushioning can block ventilation or allow the pump to tip. Leave approximately 2 inches of open space around the pump so heat can escape.
Make sure the housing is not touching the aquarium stand, wall, glass, or another device. Those surfaces can amplify a normal motor hum. If the pump has rubber feet, confirm that all of them contact the surface. A missing foot can turn a quiet pump into a vibrating one.
3. Check the pump’s position and water level — 3 minutes
Whenever possible, position the pump above the aquarium’s waterline. If it must sit below the waterline, install a check valve in the airline with the arrow pointing toward the aquarium. Place the valve several inches from the tank, where you can inspect it easily.
Do not loop the airline into a low pocket where condensation can collect. Keep the line rising continuously from the tank toward the pump, or place the check valve before any low section. A backflow event can send water into the pump, create unusual noises, and cause electrical damage.
4. Inspect the airline tubing and connectors — 5 minutes
Look for sharp bends, crushed sections, splits, cloudy buildup, and loose connections. Replace tubing that has become stiff, flattened, or discolored. Cut a clean end and push it firmly over the pump outlet, connector, check valve, or air stone.
Do not seal a loose connection with household glue or tape. If the tubing no longer grips the fitting, replace it. A small air leak can make the pump sound strained while reducing bubbles at the aquarium. For most home aquariums, standard aquarium airline tubing is inexpensive, but confirm that its inside diameter fits your connectors.
5. Clean or replace the air stone — 10 to 15 minutes
Unplug the pump, remove the air stone, and inspect it for algae, mineral deposits, or a heavy coating of debris. Rinse it in a bowl of removed aquarium water. Avoid rinsing biological filter media under untreated tap water, but a separate air stone can be cleaned according to its material and the manufacturer’s instructions.
If the stone remains clogged, cracked, or produces bubbles from only one small area, replace it. A blocked stone increases back pressure, which can make the pump louder and reduce output. When installing a new stone, place it where it will not rub against the glass or aquarium decor. That contact can transfer vibration into the tank.
6. Check the air adjustment and outlets — 3 minutes
If your pump has an adjustable control, open it gradually while the pump is running. A nearly closed outlet can create extra back pressure and noise. For a dual-outlet pump, connect both outlets as intended or use the manufacturer’s recommended adjustment method. Do not pinch an unused line shut unless the pump specifically allows it.
Check that each connector is fully seated and that a splitter is not blocked. If one outlet is unused, a compatible control valve or approved cap may be necessary. Avoid improvised plugs that could pop off and spray water.
7. Test the setup and isolate the remaining noise — 5 minutes
After reconnecting the tubing, place the pump on its pad, keep the electrical connection dry, and plug it in. Watch the bubbles for several minutes. They should be reasonably steady, and the pump should not slide, rattle, or become unusually hot.
If the pump is still loud, briefly disconnect the airline from the pump outlet while keeping the pump away from water. A change in sound suggests restriction downstream, such as a clogged air stone, check valve, or tube. No change, especially with a mechanical rattle, points more strongly to an internal pump problem.
8. Inspect the housing only if the manual permits it — 10 minutes
Unplug the pump again before inspecting screws, the cover, or external rubber feet. Tighten only visibly loose exterior fasteners. Do not open a sealed motor housing, bypass a safety feature, or handle internal wiring unless the manufacturer specifically provides a safe service procedure.
If the pump has a replaceable diaphragm and the manual identifies the correct part, a replacement diaphragm may restore quiet operation. Match the exact model and follow the instructions. Otherwise, replacing the pump is usually safer and more practical than attempting an unapproved repair.
Mistakes to Avoid
- Running without a check valve: A power outage or disconnected airline can allow water to siphon toward the pump.
- Using a soft, unstable cushion: Thick bedding may trap heat or let the pump tip over.
- Ignoring a clogged air stone: Restricted airflow can increase back pressure and shorten pump life.
- Putting the pump directly on the stand: Hard surfaces amplify vibration through the furniture and aquarium.
- Submerging or rinsing the motor: The pump housing and plug must stay dry.
- Over-tightening fittings: Crushed tubing and cracked plastic connectors can create leaks.
- Choosing an oversized pump: Excessive airflow can stress decorations, disturb fish, and require constant throttling.
- Opening the housing while connected: Always unplug the pump before inspection or maintenance.
How Often
Listen to the pump weekly when feeding fish or performing routine tank care. Inspect the airline and check valve monthly, and wipe dust from the pump’s exterior and ventilation openings. Air stones may need cleaning every one to three months, depending on algae, mineral buildup, and the tank’s bioload. Replace them when cleaning no longer restores even bubbles.
After a power outage, check for water in the airline before restarting the pump. Replace brittle tubing promptly rather than waiting for a complete split. Keep a spare check valve and air stone on hand, especially for a tank that relies on air-driven filtration or supplemental oxygen.
When to Call a Pro or Replace
Most aquarium air pumps are inexpensive appliances, so replacement is often more sensible than professional repair. Replace the unit if it smells burnt, shocks you, trips a breaker or ground-fault outlet, leaks water into the housing, overheats, or continues making a grinding or clicking noise after the airline is clear.
Stop using it immediately if the power cord is cracked or damaged. Do not repair a wet electrical component yourself. Seek help from an aquarium professional if the fish are gasping, the tank has no effective surface movement, or the pump supports critical filtration and you are unsure how to maintain oxygen while troubleshooting. A temporary battery-operated air pump can provide backup aeration during an outage.
FAQ
Why is my aquarium air pump suddenly loud?
The most common causes are a clogged air stone, kinked tubing, a loose connection, or vibration against the aquarium stand. Unplug the pump, clear the airflow path, and place it on a firm vibration-absorbing pad. A sudden grinding sound or hot housing suggests internal wear.
Should an aquarium air pump sit on foam?
Yes, a thin, firm silicone or foam pad can reduce vibration. Keep the pump level, ventilated, and stable. Avoid thick, loose bedding that could cover ventilation openings or allow the pump to fall.
Can I make an air pump quieter by closing the valve?
Partially restricting airflow may change the sound, but it can also increase back pressure. Clean or replace the air stone and check the tubing first. Use only an adjustment control designed for the pump, and do not completely block an outlet unless the manufacturer permits it.
How long should an aquarium air pump last?
Service life varies with use, dust, moisture, back pressure, and construction. A pump that runs continuously may eventually need a diaphragm or replacement. Replace it when it becomes electrically unsafe, overheats, loses dependable airflow, or remains noisy after routine maintenance.
Ready to decide? Our #1 pick for 2026 is the Clean towel or silicone mat.
Live price & availability on Amazon.
Related Reviews & Guides
Best Acrylic Aquarium For Beginners: Best Compared Buyer Guide
How To Set Up An Above Ground Koi Pond Step By Step: Trusted