Last Updated: September 25, 2026
Reef tank sump setup rests on three numbers: return flow of 5-10 times display volume after head loss, a skimmer chamber at the depth the skimmer specifies, and enough empty space to hold the drain-down volume when the power fails. Almost every serious sump failure traces back to that third figure rather than to anything chemical in the tank.
As an Amazon Associate we earn from qualifying purchases.
As an Amazon Associate we earn from qualifying purchases at no extra cost to you. Prices and availability are accurate as of the date shown and are subject to change.
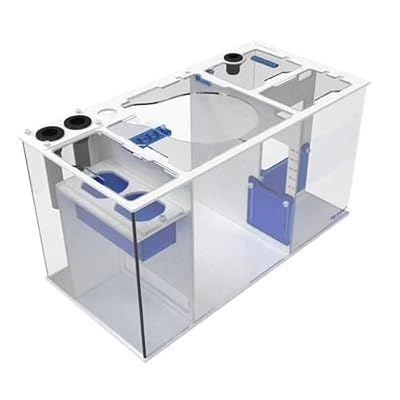
Fiji Cube Advanced Reef Sump 30
Selected for "Reef Tank Sump Setup: How It Works and What to Watch For": this listing is aquarium equipment (Fiji Cube Advanced Reef Sump 30), matching the equipment this article covers.
View on Amazon
LYL LEYOULAND Adjustable Sump Baffle Kit - Refugium Kit for 20 Gallon Long Tank - Reef Aquarium - Saltwater Aquarium Filter System- Protein Skimmer Sump
Selected for "Reef Tank Sump Setup: How It Works and What to Watch For": this listing is protein skimmers (LYL LEYOULAND Adjustable Sump Baffle Kit - Refugium Kit for 20 Gallon ), matching the equipment this article covers.
View on Amazon
Fiji Cube Fiji-20 Advanced Reef Sump 2nd Gen
Selected for "Reef Tank Sump Setup: How It Works and What to Watch For": this listing is aquarium equipment (Fiji Cube Fiji-20 Advanced Reef Sump 2nd Gen), matching the equipment this article covers.
View on Amazon
LYL LEYOULAND Adjustable Sump Baffle Kit - Refugium Kit for 10 Gallon Tank - Reef Aquarium - Saltwater Aquarium Filter System- Protein Skimmer Sump
Selected for "Reef Tank Sump Setup: How It Works and What to Watch For": this listing is protein skimmers (LYL LEYOULAND Adjustable Sump Baffle Kit - Refugium Kit for 10 Gallon ), matching the equipment this article covers.
View on AmazonBy David Nguyen
What a Sump Actually Does
A reef tank sump setup adds water volume, moves equipment out of the display and gives a fixed water level for a skimmer to work in. Each of those changes something measurable, and the third is the one most builds get wrong.
The Decision Numbers: Return Flow, Chamber Depth and Drain-Down
Return flow through the sump should be 5-10 times display volume per hour, which for a 75 gallon (284 L) display means 375-750 GPH (1420-2839 LPH) delivered. Rated pump output drops 25-40% at 4 ft (1.2 m) of lift, so buy accordingly.
Drain-down is the figure that prevents floods. When power fails, water above the overflow plus whatever siphons back through the return line arrives in the sump, so the sump must hold that volume with 3-4 in (7.6-10 cm) of freeboard remaining.
Sump volume itself should land at 20-30% of the display where the cabinet allows. That range gives room for equipment, for the drain-down reserve and for the extra water that makes every parameter in the system move more slowly.
Why Chamber Order Matters
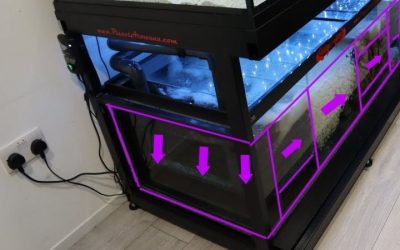
Water should meet mechanical filtration first, then the skimmer, then any refugium, then the return chamber. Skimming water that still carries particulate wastes skimmer capacity, and a refugium downstream of the skimmer keeps its nutrients available.
In a reef tank sump setup the return chamber is deliberately last and deliberately smallest. It is the only chamber whose level drops with evaporation, which is why the automatic top-off float belongs there and nowhere else in the system.
Every other chamber sits at a level fixed by its baffles, so it reads full regardless of how much water the tank has lost. A float placed in one of those will sit idle for weeks while salinity climbs in the display above it.
Target Figures and Action Thresholds
The table below gives the working numbers for a sump alongside the point where each needs attention. Most of these are physical measurements taken once at build time rather than readings tested weekly.
| Measurement | Target | Action threshold | First action |
|---|---|---|---|
| Return flow | 5-10x display volume per hour | Under 4x delivered | Clean the pump, check head loss |
| Head loss allowance | 25-40% of rated GPH | Flow well below expectation | Reduce fittings and elbows |
| Sump volume | 20-30% of display volume | Under 15% | Reduce return flow or upsize sump |
| Skimmer chamber depth | As specified, often 7-9 in (18-23 cm) | Outside the stated band | Adjust baffle height |
| Freeboard when running | 3-4 in (7.6-10 cm) | Under 2 in (5 cm) | Lower the running level immediately |
| Return chamber | Smallest chamber, top-off here | Level dropping fast | Check evaporation and the top-off |
| Filter sock changes | Twice weekly | Overflowing or bypassing | Change and rinse, add a spare |
| Micro-bubbles in display | None visible | Persistent stream | Check bubble trap and skimmer output |
Freeboard is the row worth testing physically. Turn the return pump off with the sump at its normal running level and watch what arrives; if it comes close to the rim, the running level is too high and needs lowering before livestock goes in.
Building It in a Real Cabinet
A reef tank sump setup has to fit a cabinet opening, which is usually the binding constraint. This section covers measurement, sizing across common displays, and what actually goes in each chamber.
Tank Size, Placement and Fit
Measure the cabinet door opening rather than the internal width before ordering a sump, since a sump that fits the cabinet but not the doorway cannot be installed without dismantling the stand around it.
Check height as well. A skimmer 20 in (51 cm) tall standing in a sump needs clearance above it to lift the collection cup out, so the usable cabinet height is the internal figure minus the cup removal distance.
How 40, 75 and 125 Gallon Displays Differ
A 40 gallon (151 L) display suits a sump of 10-15 gallons (38-57 L), which is enough for a skimmer chamber and a return section but rarely a useful refugium as well.
At 75 gallons (284 L) a 20-30 gallon (76-114 L) sump gives room for all three sections. At 125 gallons (473 L) the sump can hold a refugium large enough to matter for nutrient export rather than being decorative.
What Goes in Each Chamber
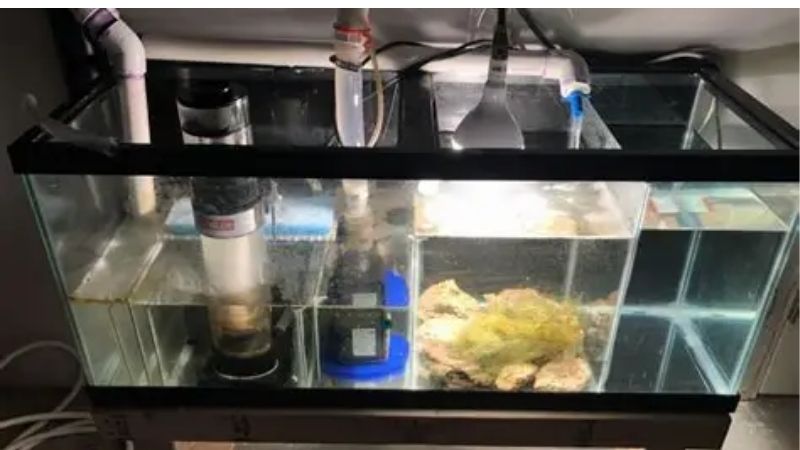
Chamber one takes the drain, a filter sock or filter roll, and usually the heater, since flow through it is highest. Chamber two holds the skimmer at its specified operating depth, with baffles setting that level independently of the rest of the sump.
Chamber three, if present, is the refugium with macroalgae and a light on a reverse cycle. Chamber four is the return, holding the pump, the top-off float and the smallest volume, since it is the only level that moves.
Reactors and media bags go in the skimmer chamber or a dedicated fourth section rather than the return, since the return chamber level changes and any device that must stay submerged will eventually run dry there between top-ups.
Myths That Cause Sump Floods
Three beliefs cause most of the cabinet floods in reef keeping, and all three are testable with the pump switched off before any livestock goes into the tank. Each is paired below with the measurement that replaces it.
Myth: A Bigger Sump Is Always Safer
Volume helps only if it is empty volume held in reserve. A large sump filled to within an inch of the rim holds no drain-down capacity at all, so it floods exactly as readily as a small one running at the same level.
The replacement measure is freeboard rather than gallons. Run the sump 3-4 in (7.6-10 cm) below the rim and test the power-off level physically, because that test is the only thing that actually confirms the arrangement is safe.
Myth: A Bigger Return Pump Is Better
Return flow above about 10 times display volume pushes water through the sump faster than the skimmer can process it and drives micro-bubbles into the display. It also raises the noise from the overflow considerably.
Aim for 5-10 times and let powerheads supply the rest of the 20-40 times total flow a reef needs. The return pump moves water between two boxes; the wave makers create the circulation the corals actually experience.
Myth: The Top-Off Can Go Anywhere
Every chamber except the return holds a level set by baffles, so a float placed in one of those will never register evaporation. It will read full indefinitely while salinity climbs in the display above it.
Place the float in the return chamber, which is the only section whose level falls as water evaporates. That single detail is the difference between a top-off that works and one that quietly does nothing for weeks on end.
Add a second, independent float as a backup where the design allows. Top-off failures move salinity in whichever direction the fault happens to take, and a redundant switch is considerably cheaper than the livestock a runaway top-off can cost.
Running It Past the First Year
A reef tank sump setup is largely maintenance-free once tuned and commissioned properly, which is why its slow failures go unnoticed. This section covers the routine, what degrades, and the running cost of the arrangement.
The Weekly and Monthly Routine
Twice weekly: change the filter sock, since a blocked sock bypasses rather than stopping, sending unfiltered water onward. Weekly: empty the skimmer cup, clean its neck and check the return chamber level and top-off reservoir.
Monthly: strip and clean the return pump of calcium deposits, check baffle joints for leaks, and clear detritus from the first chamber where it accumulates. Quarterly, verify actual return flow against the figure the build was designed around.
Re-test the drain-down level annually as well. Coralline algae narrows a standpipe over time, which raises the display level slightly and eats into the freeboard margin that was measured when the system was first commissioned.
What Fails and What It Does
Return pumps lose flow gradually as deposits build, which reduces turnover without changing the noise. Overflow standpipes partially block with coralline algae, raising the display level and reducing the safety margin you measured at build time.
Baffle silicone can fail on a used or home-built sump, which shows as one chamber level disagreeing with its neighbour. Check the levels against each other monthly, since a slow baffle leak looks like a skimmer tuning problem at first.
The 12-Month Running Cost
Recurring spend is filter socks or roll media, an occasional return pump impeller, refugium lighting hours and the electricity for a pump running continuously. None of it is large, and socks are the item most often underestimated.
On timing, sumps, return pumps and skimmers see their deepest discounts in late June and again in late November, which suits a planned build. A sale changes nothing biological, and prices move constantly, so check at the moment of purchase.
Reef Tank Sump Setup Questions
These arrive while the plumbing is being planned. Every answer about a reef tank sump setup points at a measurement, because the failures in this part of the system are physical rather than chemical.
How big should the sump be?
Twenty to thirty per cent of display volume where the cabinet allows, which is 15-25 gallons (57-95 L) under a 75 gallon (284 L) display. The binding constraint is almost always the cabinet door opening rather than the ideal figure.
How do I stop micro-bubbles?
Add a bubble trap of three baffles spaced about 1 in (2.5 cm) apart before the return chamber, and check that return flow is not above 10 times display volume. Skimmer output aimed into a baffle rather than the return also helps.
Do I need a refugium?
Not essential. It exports nutrients through macroalgae growth and shelters copepods, which is useful, but a skimmer plus water changes covers export on most tanks. Add it if the sump has room rather than upsizing the sump for it.
What happens in a power cut?
Water above the display overflow drains down, plus whatever siphons back through the return line before the check point breaks. Test this physically with the pump off before stocking, and drill a small siphon break hole in the return.
Where does the heater go?
In the first chamber where flow is highest, fully submerged and below the lowest running level. That keeps it out of the display and ensures it never runs exposed if the return chamber level drops between top-ups.
See More:
Conclusion
A working reef tank sump setup comes down to return flow at 5-10 times display volume after a 25-40% head loss allowance, a skimmer chamber at its specified depth, and 3-4 in (7.6-10 cm) of freeboard for drain-down.
Order the chambers mechanical, skimmer, refugium, return, put the top-off float in the return chamber only, and test the power-off level physically before any livestock goes in. Every serious sump failure is a level problem rather than a chemistry one.

Best Aquarium Controller for a Reef Tank: Proven Top Picks
Best Aquarium Overflow Box for Saltwater Tanks: Top Picks