Last Updated: October 4, 2026
Installing aquarium substrate in layers is more than an appearance upgrade. The right base gives aquatic plants room to root, creates a stable surface for beneficial bacteria, and helps prevent cloudy water. Done poorly, substrate can trap waste, smother roots, scratch the aquarium, shift into the wrong layer, or release a large cloud of dust that takes days to settle. A poorly planned depth can also reduce swimming space and make routine cleaning difficult.
This guide explains how to install aquarium substrate layers in a freshwater aquarium, including a nutrient-rich planted base, an inert gravel cap, and a practical slope. The method works for many tanks, from compact desktop aquariums to larger community setups. In 2026, a typical two-layer setup costs roughly $25 to $60, depending on tank size and the type of substrate you choose.
As an Amazon Associate we earn from qualifying purchases at no extra cost to you.

What You Need
| Item | Why | Optional? |
|---|---|---|
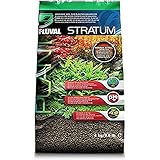
| Nutrient-rich aquarium soil, such as Fluval Plant and Shrimp Stratum, 8.8 pounds, about $25–$35 | Supports rooted plants and provides a lightweight planting layer | No for heavily planted tanks; yes for fish-only tanks |
| Inert gravel, such as Aqua Natural Diamond Black Fine Gravel, 10 pounds, about $12–$20 | Creates a durable top layer and finished appearance | Optional if you want a single-layer aquasoil layout |
| Clean bucket or plastic tub | Holds substrate during rinsing and preparation | No |
| Fine-mesh aquarium net, scoop, or plastic cup | Places substrate without damaging the glass | One of these tools is recommended |
| Plate, shallow bowl, or plastic bag | Diffuses water flow during filling and reduces disturbance | Yes, but strongly recommended |
| Dechlorinated water | Prevents chlorine or chloramine from harming fish and beneficial bacteria | No |
| Plant tweezers, scissors, and a clean ruler | Helps position plants and measure consistent substrate depth | Yes |
Before buying, calculate the tank’s footprint. A useful starting estimate is 1 pound of gravel for every gallon when creating a layer about 1 inch deep, although grain size changes the actual coverage. For a 20-gallon tank measuring approximately 24 by 12 inches, plan on about 20 to 30 pounds total for a planted layout 2 to 3 inches deep. Always check the product’s coverage guidance because soil and gravel have different densities.
Step-by-Step
1. Empty, inspect, and clean the aquarium (20–30 minutes)
Place the aquarium on a level, sturdy stand away from direct sunlight and heating vents. Inspect the bottom glass and silicone seams for cracks, chips, or separation. Wipe the inside with water and a clean, unused sponge or microfiber cloth. Do not use soap, household glass cleaner, or disinfectants that can leave harmful residue.
If you are reusing an aquarium, remove old gravel and vacuum out debris. Check that the filter, heater, light, and thermometer are rated for the tank’s volume. For example, many planted tanks use an LED fixture drawing roughly 15 to 40 watts, but the correct wattage depends on the light’s design and the plants you intend to grow.
2. Plan the layers and slope (10–15 minutes)
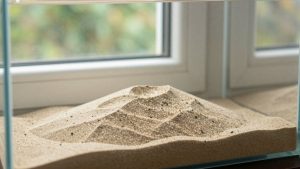
Decide where plants, hardscape, and open swimming areas will go before adding substrate. A practical planted profile is 1 to 2 inches of nutrient-rich soil topped with 1 to 1.5 inches of gravel. Keep the front around 2 inches deep and slope the substrate toward the back to about 3.5 or 4 inches. The slope improves visibility and makes the tank look deeper.
Avoid making the entire aquarium excessively deep. More than about 4 inches can create difficult-to-clean areas and may compact around plant roots. Leave enough room for decorations, equipment, and a visible waterline.
3. Add the bottom substrate carefully (10–20 minutes)
Place the nutrient-rich soil directly onto the dry aquarium floor. Do not pour a heavy bag into one spot, which can put unnecessary pressure on the glass. Add it in several small piles and spread it with a plastic card, gloved hand, or substrate tool.
Many aquarium soils should not be aggressively rinsed because washing can break apart granules and remove useful material. Follow the package directions. Remove large pieces of debris, but do not try to make planting soil perfectly dust-free. Build the planned slope now, since it becomes harder to reshape after the upper layer is installed.
4. Add the gravel cap (15–25 minutes)
Rinse inert gravel in a clean bucket using tap water until the runoff is mostly clear. Do not use soap. Fine gravel may require several rinses. If the gravel is sharp or jagged, reconsider using it with bottom-dwelling fish or delicate shrimp.
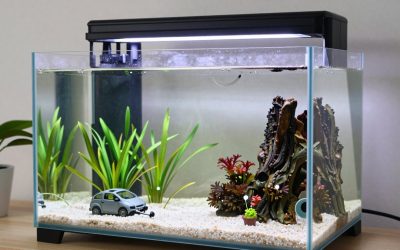
Lower a plastic cup or scoop close to the soil and release the gravel gently. You can also pour it onto a plastic bag laid over the soil. Aim for an even 1- to 1.5-inch cap, but avoid burying the soil so deeply that rooted plants become difficult to anchor. Keep the gravel layer distinct rather than stirring it into the soil.
5. Add hardscape and make final adjustments (10–20 minutes)
Position rocks, driftwood, and other decorations before filling the tank. Press heavy objects firmly into the substrate so they rest securely on the bottom or on a stable foundation. Do not place large rocks on loose gravel if they could shift and crush plants or aquarium glass.
Check the front-to-back slope from several angles. Create open zones for swimming and leave approximately 1 to 2 inches of clearance around the glass if you want easier algae scraping. Keep substrate away from filter intakes and heater controls.
6. Plant the aquarium (20–45 minutes)
Add plants before the tank is full, using enough water to keep the substrate damp but not flooded. Trim damaged roots, then use planting tweezers to insert rooted plants into the soil. Bury the roots while keeping the crown—the point where roots meet stems—at or just above the substrate surface.
Attach rhizome plants such as Anubias or Java fern to wood or rocks instead of burying their horizontal rhizomes. Spread carpeting plants into small groups rather than placing one large clump. Planting in several passes helps prevent loose soil from rising through the gravel.
7. Fill slowly and start the equipment (20–30 minutes)
Place a shallow plate, bowl, or clean plastic bag on the substrate. Pour dechlorinated water onto that surface or direct the flow against the aquarium wall. Fill slowly to avoid creating craters and mixing the layers.
Expect some initial haze, especially with fine soil. Install the filter and heater according to their instructions, but do not turn on a heater unless it is fully submerged. A common freshwater temperature range is 74–78°F, although the correct setting depends on the fish and invertebrates. Run the filter continuously and allow the tank to cycle before adding livestock.
8. Test and settle the aquarium (several days to 6 weeks)
Test ammonia, nitrite, and nitrate while the aquarium cycles. Do not add fish simply because the water looks clear. A new tank is generally ready only after ammonia and nitrite repeatedly test at zero, with nitrate controlled through water changes. The timeline can range from several days in an established, carefully seeded setup to several weeks in a completely new aquarium.
Mistakes to Avoid
- Using garden soil or construction gravel: These materials may contain fertilizers, contaminants, sharp fragments, or substances that alter water chemistry.
- Rinsing planted soil aggressively: This can destroy granules and turn the tank into a muddy mess. Rinse only when the manufacturer allows it.
- Creating one flat, overly deep layer: A slope looks more natural and keeps debris visible near the front.
- Mixing the layers during filling: Fast water flow can expose soil and produce persistent cloudiness.
- Burying plant crowns or rhizomes: This can cause rot even when the substrate depth is otherwise correct.
- Adding fish immediately: Substrate installation does not complete the nitrogen cycle.
- Vacuuming deeply into aquasoil: Remove debris from the surface and lightly hover the siphon instead of repeatedly extracting the soil.
How Often
Substrate itself does not need complete replacement on a routine schedule. Lightly vacuum exposed gravel during weekly or biweekly water changes, removing roughly 10% to 25% of the tank’s water as needed. Avoid deep vacuuming in planted soil, where it can uproot plants and remove substrate.
Inspect the surface weekly for compacted areas, trapped food, algae, or exposed soil. Reposition loose gravel during maintenance and trim dead leaves. Nutrient-rich aquasoil may gradually lose some of its planting benefits over 12 to 24 months, but healthy plants can continue growing with root tabs, liquid fertilizer, and appropriate lighting.
When to Call a Pro or Replace
Ask an experienced aquarium professional for help if the tank develops a persistent chemical problem, repeated fish losses, unexplained odors, or a substrate layer that produces black, foul-smelling pockets when disturbed. Professional advice is also worthwhile for large aquariums, custom installations, heavy rock structures, or tanks placed on questionable flooring.
Replace substrate when it contains paint chips, rust, chemical contamination, sharp debris, or persistent foul-smelling organic buildup. If the aquarium glass or seams are damaged, move livestock to a safe temporary container and address the structural problem before rebuilding the substrate.
FAQ
How thick should aquarium substrate layers be?
For most planted freshwater aquariums, use about 1 to 2 inches of aquasoil and 1 to 1.5 inches of gravel. A total depth of 2 to 4 inches works well, with the deeper portion toward the back.
Can I put gravel directly over aquarium soil?
Yes. A gravel cap can reduce soil disturbance and create a contrasting finish. Add it gently, keep the layers mostly separate, and avoid deep gravel vacuuming that pulls soil upward.
Do I need to rinse aquarium substrate?
Rinse inert gravel until the water is mostly clear, unless the product instructions say otherwise. Do not aggressively rinse aquasoil or other nutrient substrates that are designed to be added dry.
Can I add fish right after installing the layers?
No. Fill the aquarium, start filtration, dechlorinate the water, and complete the nitrogen cycle first. Confirm that ammonia and nitrite are zero before introducing fish, adding livestock gradually rather than all at once.
Related Reviews & Guides

6 Best Chillers For Aquarium 2026
5 Best Topfin Aquarium Filters (2026)