Last Updated: October 4, 2026
Rinsing aquarium substrate sounds simple, but doing it the wrong way can cloud the tank for days, crush delicate granules, strip away beneficial material, or send dust and debris into your filter. The right method depends on whether you are using inert gravel, sand, nutrient-rich planted-tank substrate, or a wet bio-substrate. A few minutes of preparation protects fish, plants, and equipment—and makes the initial fill much clearer.
For a new setup, rinse most inert gravel and sand before it enters the aquarium. For active planted substrates and wet substrates, use a much gentler approach or skip rinsing entirely if the package directs you to do so. In 2026, many popular aquarium substrates are designed to arrive with fine particles, mineral content, or bacterial media that should not be washed away under high-pressure tap water.
As an Amazon Associate we earn from qualifying purchases at no extra cost to you.

Quick answer: Our top pick in 2026 is the Clean 5-gallon bucket — our #1 rated choice. See the full ranked comparison, alternatives and buying advice below.
What You Need
| Item | Why | Optional? |
|---|---|---|
| Clean 5-gallon bucket | Lets you rinse substrate in manageable batches without losing material down a drain. | No |
| Fine-mesh colander or sieve | Useful for gravel and larger sand; prevents substrate from washing away. | Yes |
| Garden hose or sink sprayer | Provides a steady flow of water for rinsing inert substrate. | No |
| Dechlorinated water | Best for a final rinse when using active substrate, wet substrate, or water that will contact beneficial bacteria. | Yes |
| Small cup or scoop | Makes it easier to transfer substrate without scratching the aquarium glass. | Yes |
| Plate, bowl, or plastic bag | Diffuses water while filling the aquarium so the substrate layer stays in place. | Yes |
| Water conditioner | Neutralizes chlorine and chloramine in tap water before the tank is filled. | No |
Step-by-Step
1. Identify the substrate type before opening the bag (2 minutes)
Read the package instructions first. This step determines whether you should rinse, lightly swish, or use the substrate straight from the bag.
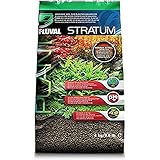
Inert gravel and most decorative stones usually need a thorough rinse because they carry quarry dust and small fragments. Inert sand also needs rinsing, although it takes more patience because fine grains can escape with the dirty water. Active planted-tank substrates, such as Fluval Plant and Shrimp Stratum, are porous and can break down if aggressively rinsed. An 8.8-pound bag, often priced around $25 to $35, is generally added carefully rather than scrubbed under a strong stream.
Wet bio-substrates should be handled especially gently. For example, a 5-pound bag of Aqua Natural Bio-Substrate Galaxy Sand may be sold wet, often around $10 to $16. Do not assume it needs the same treatment as dry gravel. If the manufacturer says the material contains live bacteria or is ready to use, avoid chlorinated tap water and do not rinse away the packing water unless the label specifically instructs you to do so.
2. Calculate how much substrate you need (5 minutes)
Plan for a substrate bed about 1 to 2 inches deep in a standard freshwater display tank. For rooted live plants, aim for 2 to 3 inches, with a slightly deeper layer toward the back. A 20-gallon long aquarium with a footprint of roughly 30 by 12 inches needs about 15 to 25 pounds of substrate for a 1.5- to 2-inch layer, depending on the material’s density.
Do not rinse an entire large bag at once. Work in batches of about 5 pounds, or enough to fill one-quarter to one-third of a 5-gallon bucket. Smaller batches rinse more evenly and are less likely to spill.
3. Rinse inert gravel in a bucket (8 to 15 minutes per 5-pound batch)
Pour one batch of gravel into a clean bucket. Place the bucket in a bathtub, shower stall, utility sink, or outdoors where overflow will drain safely. Insert the hose or sprayer into the bucket and run cool water at a moderate flow—not full blast.
Use your clean hand to stir the gravel while the bucket fills. Fine dust will rise and turn the water gray, tan, or milky. Let the water overflow slowly while continuing to stir. After 30 to 60 seconds, tip the bucket carefully to pour out dirty water without dumping the gravel.
Repeat the fill, stir, overflow, and drain process three to six times. Stop when the water is mostly clear. It does not need to look like bottled water; a faint haze is normal and will be handled by the aquarium filter after setup.
4. Rinse aquarium sand with a slower method (10 to 20 minutes per 5-pound batch)
Sand is easier to lose than gravel, so keep the water flow gentle. Add sand to the bucket, then slowly fill it with water until the water level sits 2 to 3 inches above the sand. Swirl the surface lightly with your fingers. The finest dust should lift into the water while most sand remains at the bottom.
Pour off the cloudy water slowly. If sand starts moving toward the rim, pause and let it settle for 15 to 30 seconds before continuing. Refill and repeat until the water is substantially clearer. Very fine sand may remain slightly cloudy after several rinses; that is normal.
Never rinse sand directly over a garbage disposal. Fine grains can settle in plumbing traps and contribute to clogs. Use a bucket and pour wastewater into an appropriate drain only after checking that no significant sand is leaving with the water.
5. Handle active soil and wet substrate gently (2 to 5 minutes)
Do not use the bucket-overflow method for active planted-tank soil unless its label specifically permits it. These granules can crumble, releasing more dust and reducing their useful lifespan. Instead, place the substrate directly into the empty aquarium with a cup or scoop. Remove any obvious damaged packaging material or foreign debris, but do not scrub the granules.
If you want to reduce initial cloudiness, add just enough dechlorinated water to cover the substrate, gently move it once or twice with your hand, and carefully pour off surface dust. Limit this to one quick rinse. For wet bio-substrate, follow the package directions exactly; in many cases, adding it with its original moisture is the safer choice.
6. Add substrate to the aquarium without scratching the glass (5 minutes)
Make sure the aquarium is empty, clean, and sitting level on its stand. Transfer rinsed substrate with a plastic scoop, cup, or your hand. Do not pour a heavy bucket against the glass. A single piece of gravel caught between the bucket rim and tank panel can scratch glass or acrylic.
For a natural-looking layout, keep the front layer around 1 inch deep and slope it to 2.5 to 3 inches in the back. This creates visual depth and gives rooted plants more room. Keep the substrate away from heater guards, intake tubes, and under-gravel filter components if you use them.
7. Fill the tank slowly and inspect the water (15 to 30 minutes)
Place a dinner plate, shallow bowl, or clean plastic bag on top of the substrate. Pour conditioned water slowly onto that surface rather than directly onto the sand or gravel. This prevents craters and minimizes cloudiness.
Once the tank is full, run the filter. A filter rated for a 20-gallon tank commonly uses about 3 to 8 watts, while larger hang-on-back or canister filters may use more. Mild cloudiness should improve within several hours to 24 hours. If the water remains heavily cloudy after 48 hours, check for an overly disturbed active substrate, insufficient mechanical filtration, or a layer of unwashed dust.
Mistakes to Avoid
- Using soap, dish detergent, or household cleaners. Even tiny residues can be dangerous to fish and invertebrates. Use water only.
- Rinsing active soil like gravel. Strong water pressure can pulverize porous granules and create persistent murkiness.
- Putting wet bio-substrate under untreated tap water. Chlorine and chloramine can harm beneficial bacteria.
- Rinsing huge batches. More than 8 to 10 pounds at a time is hard to stir, drain, and control safely.
- Chasing perfectly clear rinse water. Excessive rinsing can waste water and is usually unnecessary. “Mostly clear” is enough for inert material.
- Adding fish immediately after filling. Clear water does not mean a tank is biologically ready. Cycle the aquarium before adding livestock.
How Often
New substrate should be rinsed only before installation, if its product instructions call for rinsing. Once it is in an established aquarium, do not remove and rinse the entire substrate bed during routine maintenance. That can disrupt beneficial bacteria, uproot plants, and release trapped debris all at once.
Instead, siphon small sections during water changes. For gravel, vacuum about one-third of the bottom at each weekly or biweekly water change. For planted tanks, lightly hover the siphon above the surface and avoid deep cleaning around plant roots. Sand generally needs surface debris removed rather than deep vacuuming, because waste stays on top.
When to Call a Pro or Replace
Consider professional aquarium help if the substrate produces a persistent rotten-egg odor, the tank repeatedly develops severe cloudiness despite proper filtration, or you suspect contamination from chemicals, paint, construction dust, or soap. Remove and replace substrate if it was exposed to household cleaners, pesticides, salt intended for de-icing, or unknown substances.
Replacement may also make sense when active soil has broken down into mud, no longer supports stable plant roots, or continually releases excessive fines. In a large aquarium—especially one over 55 gallons—removing a deep substrate bed can affect water chemistry and livestock, so plan the change in sections rather than stripping the tank in one day.
FAQ
Do I need to rinse all aquarium substrate?
No. Dry inert gravel and sand usually benefit from rinsing. Active planted substrates and wet bio-substrates may need only a brief gentle swish or no rinse at all. Always follow the instructions on the specific bag.
Can I rinse aquarium substrate with tap water?
Yes, for inert gravel and most inert sand before the aquarium is set up. Use dechlorinated water for a final rinse if desired. Avoid untreated tap water for products marketed with live bacteria or wet biological media unless the manufacturer says it is safe.
How clear should the rinse water be?
For gravel and sand, stop when the water changes from heavily cloudy to mostly clear with only a light haze. Trying to achieve perfectly transparent water is unnecessary and can take far longer than the benefit warrants.
What should I do if the aquarium is cloudy after adding substrate?
Keep the filter running, avoid stirring the bottom, and give the tank 24 to 48 hours to settle. Add fine filter floss if your filter can hold it, and perform a small 10% to 20% conditioned water change only if cloudiness remains heavy. Do not repeatedly drain and refill the tank, since that can keep fine particles suspended.
Ready to decide? Our #1 pick for 2026 is the Clean 5-gallon bucket.
Live price & availability on Amazon.
Related Reviews & Guides
Best Aquarium Kit Under 100: Best Proven Well-Researched Guide
Ember Tetra Care: Schooling, Feeding and Tank Setup