Last Updated: October 4, 2026
Cleaning an aquarium light cover is a small maintenance job, but doing it incorrectly can create big problems. Mineral deposits, salt creep, algae, dust, and condensation can block light and make an LED fixture run hotter than intended. A cracked cover or damp electrical connection can also lead to flickering, corrosion, shock, or permanent fixture failure. The safest approach is to remove the cover when possible, keep water away from electrical components, and use gentle cleaners that will not harm fish or aquarium seals.
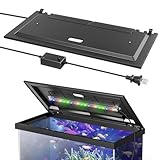
This guide explains how to clean LED aquarium light covers without scratching plastic, loosening waterproof seals, or accidentally dropping debris into the tank. The same process works for many 24-inch framed-aquarium hoods, including basic colored-light models and full-hood designs. Set aside about 20 to 30 minutes for cleaning, plus drying time.
As an Amazon Associate we earn from qualifying purchases at no extra cost to you.

Quick answer: Our top pick in 2026 is the Clean microfiber cloths — our #1 rated choice. See the full ranked comparison, alternatives and buying advice below.
What You Need
| Item | Why | Optional? |
|---|---|---|
| Clean microfiber cloths | Lift dust and water spots without leaving lint or fine scratches | No |
| Lukewarm tap water | Rinses away loose grime and diluted mineral residue | No |
| White vinegar | Dissolves calcium and salt deposits on removable plastic covers | Optional |
| Small bowl or spray bottle | Holds a diluted cleaning solution | Optional |
| Soft toothbrush or cotton swabs | Reaches seams, vents, clips, and corners | Optional |
| Nitrile gloves | Protect hands from residue and provide a better grip | Optional |
| Dry towel | Supports the cover and catches drips during cleaning | No |
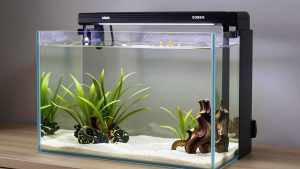
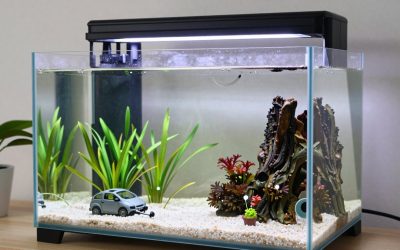
For a typical 24-inch aquarium hood, such as a Blosail LED Aquarium Hood priced around $50 or an Aqueon LED Deluxe Full Hood priced around $65, the basic supplies above are sufficient. Do not use glass cleaner, bleach, ammonia, abrasive powders, melamine sponges, or rough paper towels. These products can haze clear plastic, weaken seals, or leave residues near aquarium water.
Step-by-Step
-
Turn off and unplug the light — 2 minutes
Switch off the aquarium light, then unplug it from the wall outlet before touching the cover. If the plug or power adapter is below the tank, keep it elevated and dry. For a light controlled by a timer or smart plug, disconnect the plug rather than relying only on the timer.
Wait several minutes for the LEDs and housing to cool. Never clean a hot plastic cover with cold water; a sudden temperature change can stress or warp the material.
-
Move the light to a dry work area — 3 minutes
Check the manufacturer’s instructions for your hood or light before removing anything. If the cover is designed to detach, place a folded towel on a nearby counter and carry the cover there. Keep the aquarium lid, hinges, clips, and screws together so nothing falls into the tank.
If the cover is permanently attached to the fixture, leave the fixture in place. Do not immerse it or hold it under a faucet. Instead, clean only with a damp cloth that has been wrung out thoroughly.
-
Remove loose dust and debris — 2 minutes
Use a dry microfiber cloth to wipe both sides of the cover. Brush gently around LED windows, ventilation slots, hinges, and edges. Removing loose grit first is important because rubbing dust across plastic can cause fine scratches.
For a narrow seam, use a dry cotton swab or a soft toothbrush. Avoid pushing debris into a vent, electrical opening, or gasket.
-
Mix a mild cleaning solution — 1 minute
For ordinary dust or light film, use lukewarm water alone. For white mineral deposits, mix equal parts white vinegar and water in a bowl. A small batch, such as 4 ounces of vinegar plus 4 ounces of water, is more than enough for most aquarium covers.
Do not add soap unless the product instructions specifically allow it. Even a small amount of detergent can leave a residue that enters the aquarium during reassembly or condensation.
-
Clean the cover gently — 5 to 10 minutes
Dip a microfiber cloth into the solution and wring it until it is damp, not dripping. Wipe the cover in straight, overlapping passes. Allow the diluted vinegar to sit on stubborn mineral spots for two to three minutes, then wipe again.
Use a soft toothbrush for corners and textured areas. Do not scrape deposits with a knife, razor blade, metal tool, or credit card. Scratches can scatter light and create places for algae to collect.
Keep all liquid away from LED strips, circuit boards, plugs, switches, seams, and power adapters. If you need to clean near an electrical part, put the solution on the cloth rather than spraying it directly.
-
Rinse away the solution — 2 minutes
If the cover is fully removable and contains no electrical components, rinse it with clean lukewarm water. Otherwise, wipe it several times with a fresh cloth dampened with plain water. This removes vinegar and loosened residue.
Inspect the cover under a bright room light. Repeat the process rather than using a stronger chemical. A second gentle pass is safer than aggressive scrubbing.
-
Dry every surface completely — 5 to 15 minutes
Pat the cover with a dry microfiber cloth and leave it on a clean towel until no moisture remains. Pay special attention to clips, screw holes, hinges, channels, and rubber gaskets. If water is trapped inside a seam, give it extra drying time.
Do not use a hair dryer on its hot setting. Heat can deform plastic and force moisture deeper into a housing. Cool, moving air is acceptable, but natural air-drying is usually safer.
-
Inspect and reinstall — 3 minutes
Before reinstalling the cover, look for cracks, cloudiness, loose clips, brittle rubber, corrosion, or a gasket that has flattened or pulled out of its channel. Confirm that the cover sits evenly and that no wire is pinched.
Wipe the outside of the assembled hood once more, then reconnect power only after the fixture and your hands are completely dry. Watch the light for flickering, unusual heat, or a delayed startup. Unplug it immediately if any of these problems appear.
Mistakes to Avoid
- Cleaning while plugged in: Even a splash-resistant light should be unplugged before maintenance.
- Spraying the fixture: Aerosol or spray cleaner can enter vents and travel along wires into electrical components.
- Using abrasive tools: Scrub pads, razor blades, and gritty cleaners can permanently scratch clear plastic.
- Submerging the wrong part: Only immerse a cover that is clearly separate from all LEDs, wiring, switches, and power connections.
- Ignoring condensation: Repeated moisture inside the housing may indicate a failed seal, poor ventilation, or a cover that is not seated correctly.
- Reinstalling too soon: A damp gasket or connector can trap moisture where you cannot see it.
- Using household disinfectants: Bleach, ammonia, and fragranced cleaners may harm fish, plants, seals, and plastic.
How Often
Wipe the outside of the cover every one to two weeks, especially if the aquarium is open or located in a dusty room. Perform a deeper cleaning every four to eight weeks. Tanks with hard water, high evaporation, saltwater, or frequent feeding may need monthly cleaning, while a covered freshwater tank in a clean room may need a thorough cleaning only every two to three months.
Check the cover whenever you top off the aquarium. Removing mineral spots while they are thin takes less effort than trying to dissolve a thick, opaque layer later. Keep water levels below the hood’s recommended fill line, since splashes and condensation are major causes of residue.
When to Call a Pro or Replace
Stop using the light and seek qualified electrical help if you notice melted plastic, exposed wiring, a burning smell, repeated tripped breakers, buzzing, arcing, or water inside the electrical housing. Aquarium equipment operates near water, so do not attempt an internal repair unless you have the appropriate electrical knowledge and the product is designed to be serviced.
Replacement is usually more practical when the cover is deeply scratched, permanently yellowed, cracked, warped, or no longer seals against condensation. A replacement hood or light may cost roughly $40 to $100 for a common 20- to 24-inch aquarium, depending on brightness, controls, lid design, and waterproofing. Replace the entire unit if a separate cover is unavailable or if corrosion has reached the LED board.
FAQ
Can I use vinegar on an LED aquarium light cover?
Yes, diluted white vinegar is generally suitable for a removable plastic cover with mineral deposits. Use a 1:1 mixture with water, keep it away from electrical parts, rinse thoroughly, and dry completely before reassembly.
Can I clean the LED light while it is over the aquarium?
Yes, but only with a barely damp cloth after unplugging it. Do not spray, pour, or rinse the fixture over the tank. Removing a detachable cover is safer and makes it easier to prevent cleaner or loosened debris from entering the water.
Why does my aquarium light cover keep getting cloudy?
Cloudiness usually comes from mineral deposits, salt creep, algae film, condensation, or aging plastic. If cleaning does not restore clarity, the material may be permanently hazed or damaged by heat and should be replaced.
How bright should an LED aquarium light be after cleaning?
It should look steady and even across the cover, with no flickering or dark sections. Cleaning can restore blocked light, but it cannot repair failed LEDs. If brightness remains uneven after the cover is clean and dry, inspect the fixture’s connections or consider replacement.
Ready to decide? Our #1 pick for 2026 is the Clean microfiber cloths.
Live price & availability on Amazon.
Related Reviews & Guides
Best Unbreakable Fish Tank for Classrooms: Smart Safe Picks
Best Small Aquarium Under 5 Gallons: Best Compared Buyer Guide