Last Updated: October 21, 2026
Four errors account for most returned skimmers: choosing before deciding placement, sizing from display gallons alone, assuming a footprint that fits means a water level that works, and believing bigger is automatically safer. The common mistakes when buying a protein skimmer are all avoidable.
As an Amazon Associate we earn from qualifying purchases.
By David Nguyen
How Protein Skimmer Buying Mistakes Happen
Each mistake starts with one variable being ignored. Placement decides the product category, total water volume and bioload together decide capacity, operating depth decides eligibility, and organic availability decides whether a large body can produce genuinely stable foam at all.

Placement Is the First Decision, Not the Last
BRS frames placement and type as the opening question, because hang-on-back, in-sump and all-in-one designs are genuinely different products rather than variations on one theme. Any shortlist assembled before that decision inevitably contains several models that you cannot install.
The watch-out threshold is any comparison spreadsheet mixing categories together. Decide where the skimmer physically goes, then eliminate everything built for the other positions, and only then compare capacity, price and air draw within the one category that actually fits your system.
Display Gallons Are Not System Volume
Skimmers process every drop of connected water, so sizing from the display alone understates the job. BRS frames sizing around total water volume combined with bioload, which means adding sump volume and plumbing before any published rating is checked against that combined result.
Bioload shifts the answer as much as volume does, and medium to heavy loading is common in stocked reefs rather than exceptional. The threshold worth watching is any purchase justified purely by the number printed on the tank, with no feeding or stocking assessment attached to it.
Fitting the Footprint Is Not Fitting the Depth
Two separate measurements decide installation, and buyers routinely check only one. Published operating depths differ substantially between models, with the Curve 5 Elite specifying 9.5 to 11 inches, TUNZE listing 8.9 to 9.7 inches for the 9004 and the Quantum 120 needing 8.5 inches.
Those figures are strictly model-specific rather than category conventions, so a generic eight inch assumption is not a requirement you can rely on. Measure your chamber depth alongside the floor area, then check both against the exact model in question rather than against a rule of thumb.
Bigger Is Not Automatically Safer
Oversizing feels like insurance and frequently is not. BRS warns that a grossly oversized skimmer may not work consistently, because foam production depends entirely on sufficient organics being available for the body and the pump to process reliably into genuinely stable skimmate.
The threshold is any purchase reaching several capacity steps beyond the adjusted requirement. Staying within one size step of your load-adjusted figure delivers comfortable operation, while a body designed for far more organic input than your own system produces will run erratically.
What the Mistakes Look Like in Practice
These four scenarios show the same oversights failing in four different fish rooms: a skimmer that cannot mount, a unit undersized by a sump, a body floating at the wrong level, and an oversized purchase producing microbubbles right through the display instead of any useful skimmate.
| Factor | Normal Range | Watch-out Threshold | What to Do |
|---|---|---|---|
| Placement | Type chosen before models | Shortlist mixes categories | Decide position first |
| Volume input | Display plus sump plus plumbing | Display gallons only | Add the whole system |
| Operating depth | Matches the exact model range | Generic eight inch assumption | Measure and check |
| Capacity headroom | Within a step of adjusted need | Several steps oversized | Size to the real load |
A Skimmer That Cannot Be Mounted
The buyer compared capacity and price across a dozen models without ever settling placement, then ordered an in-sump body for an all-in-one tank with no sump chamber. Nothing was faulty, and the specification sheet was entirely accurate; the product simply belonged to an entirely different category.
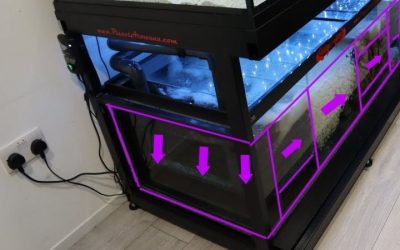
Deciding on placement first eliminates that entire outcome in a single step. Write down whether the skimmer hangs on the back, sits inside a sump or drops into an all-in-one chamber, then filter every subsequent comparison through that one single physical constraint from the outset.
A Unit Undersized by an Entire Sump
Someone sized a skimmer against a 40 gallon display and forgot the 15 gallon sump plus plumbing, which put the actual connected volume closer to 55 gallons before livestock was even considered. Foam production never quite kept pace with the feeding load from the very first month onward.
Adding every connected volume before checking any rating removes that error entirely. Bioload then adjusts that figure downward again, since a stocked reef with daily feeding sits in the medium to heavy band rather than in the light band that most headline ratings quietly assume instead.
A Body Floating at the Wrong Level
A skimmer arrived, dropped neatly into the available floor space and then produced thin, unstable foam for several weeks. The sump ran roughly seven inches deep while the model specified a range beginning above nine, so the body never once sat at its own designed operating level.
Footprint and depth are two separate checks, and only the second one stays invisible until installation day. Measuring water height before ordering, then comparing it against the exact model’s published range, prevents an otherwise well-chosen skimmer from underperforming more or less permanently.
An Oversized Purchase Making Microbubbles
Reasoning that headroom is always safer, one buyer fitted a body rated far beyond the system to a lightly stocked reef. Foam refused to stabilise, the neck stayed wet and microbubbles appeared in the display, which is exactly the outcome that BRS warns gross oversizing can produce.
The correction is uncomfortable, usually meaning resale followed by replacement with a correctly sized unit. Sizing to the load-adjusted requirement rather than to the largest affordable number avoids paying twice over for capacity that this system could never have supported anyway.
Frequently Asked Questions
Four questions follow from these errors: how to calculate total volume, what break-in behaviour is normal, whether depth can be adjusted after purchase, and how much headroom is sensible. Direct answers below, along with the exceptions that genuinely matter in real installations.
How Do You Calculate Total System Volume?
Add the display, the sump and the plumbing volume together, then subtract the displacement from rock and substrate for an honest figure. The result is frequently lower than the display label suggests in the display itself and rather higher than expected once the sump has been included.
Bioload then adjusts that number rather than simply replacing it entirely. A stocked reef fed daily clearly belongs in the medium to heavy band, which is where load-specific retailer ratings and manufacturer reductions both push the usable capacity down well below any headline figure.
What Break-In Behaviour Is Normal?
Erratic foam during the first week is entirely expected rather than faulty, and BRS guidance describes roughly five to seven days before any final tuning on a new skimmer. Surfaces condition during that period and foam stability generally improves without any adjustment at all from you.
Resist continuous fiddling while that happens, since repeated changes make it impossible to attribute any later improvement correctly. Set the water level within the published range, then wait out the whole break-in window, then make one small adjustment and then evaluate the result properly.
Can You Change Water Depth After Buying?
Sometimes, by raising the sump water level or by fitting a platform beneath the skimmer, although both alterations carry consequences. Raising the level reduces the空 space available for return pump failures, so that change needs checking carefully against your own overflow capacity.
Where adjustment proves impractical, the honest answer is that the model simply does not suit the installation. Checking the published depth range before any purchase costs nothing at all, while discovering the mismatch afterwards usually means resale at a loss or else a permanently compromised installation.
How Much Capacity Headroom Is Sensible?
Roughly one size step above your load-adjusted requirement, which leaves the body running comfortably rather than sitting at its published limit. That margin absorbs the gradual increase in both feeding and stocking that almost every reef experiences during its first two or three years of life.
Beyond that point, returns diminish and then reverse entirely, because insufficient organics will prevent stable foam formation. The correct question is not how much capacity you can afford, but rather how much organic input your own system genuinely produces week in and week out.
Final Thoughts
Decide placement, add every connected gallon, measure the water depth and size to real load. The common mistakes when buying a protein skimmer all come from skipping one of those four checks, and each one of them takes minutes compared with the cost of replacing an entirely wrong unit.
Best Kalkwasser Stirrer For Reef Tanks: Top Compared Guide

Ocellaris Clownfish Care: Tank Size, Anemones, Diet and Tank Mates