Last Updated: September 25, 2026
Aquarium sump design guide principles apply equally to freshwater and marine: size the sump at 20-30% of display volume, space bubble-trap baffles about 1 in (2.5 cm) apart, and choose the drain design before choosing a pump. The drain sets the ceiling that every other decision in the build then has to sit underneath.
As an Amazon Associate we earn from qualifying purchases.
As an Amazon Associate we earn from qualifying purchases at no extra cost to you. Prices and availability are accurate as of the date shown and are subject to change.

LYL LEYOULAND Adjustable Sump Baffle Kit - Refugium Kit for 10 Gallon Tank - Reef Aquarium - Saltwater Aquarium Filter System- Protein Skimmer Sump
Selected for "Aquarium Sump Design Guide: Sizing, Baffles and Plumbing": this listing is protein skimmers (LYL LEYOULAND Adjustable Sump Baffle Kit - Refugium Kit for 10 Gallon ), matching the equipment this article covers.
View on Amazon
LYL LEYOULAND Adjustable Sump Baffle Kit - Refugium Kit for 20 Gallon Long Tank - Reef Aquarium - Saltwater Aquarium Filter System- Protein Skimmer Sump
Selected for "Aquarium Sump Design Guide: Sizing, Baffles and Plumbing": this listing is protein skimmers (LYL LEYOULAND Adjustable Sump Baffle Kit - Refugium Kit for 20 Gallon ), matching the equipment this article covers.
View on Amazon
LYL LEYOULAND Adjustable Sump Baffle Kit - Refugium Kit for 40 Gallon Breeder Tank - Reef Aquarium - Saltwater Aquarium Filter System- Protein Skimmer Sump
Selected for "Aquarium Sump Design Guide: Sizing, Baffles and Plumbing": this listing is protein skimmers (LYL LEYOULAND Adjustable Sump Baffle Kit - Refugium Kit for 40 Gallon ), matching the equipment this article covers.
View on Amazon
AQUATOP Xyclone PS-370 Protein Skimmer – 370 GPH Needle Wheel Pump Included – For Saltwater Aquariums Up to 100 Gallons – In-Sump or Hang-On Dual Outlet Design
Selected for "Aquarium Sump Design Guide: Sizing, Baffles and Plumbing": this listing is protein skimmers (AQUATOP Xyclone PS-370 Protein Skimmer – 370 GPH Needle Wheel Pump Inc), matching the equipment this article covers.
View on AmazonBy David Nguyen
The Physics a Sump Has to Respect
An aquarium sump design guide is really a guide to two things: moving water down by gravity quietly, and moving it back up by pump reliably. Everything else, from baffle spacing to chamber layout, follows from getting those two right first.
The Decision Numbers: Sump Volume, Drain Capacity and Head Loss
Sump volume at 20-30% of display gives room for equipment and for drain-down when the pump stops. Below about 15% the sump becomes a flood risk rather than a benefit, whatever its footprint looks like in the cabinet.
Drain capacity caps return flow, not the other way round. A 1 in (25 mm) drain handles roughly 600-700 GPH (2271-2650 LPH) as a full siphon and far less as an open channel, so the pump must be sized under that ceiling.
Head loss then reduces what reaches the display. Every elbow, valve and foot of vertical lift costs flow, and a typical cabinet arrangement gives up 25-40% of the rated figure, which is why pumps are chosen by delivered rather than rated output.
Why Baffles Do Three Different Jobs
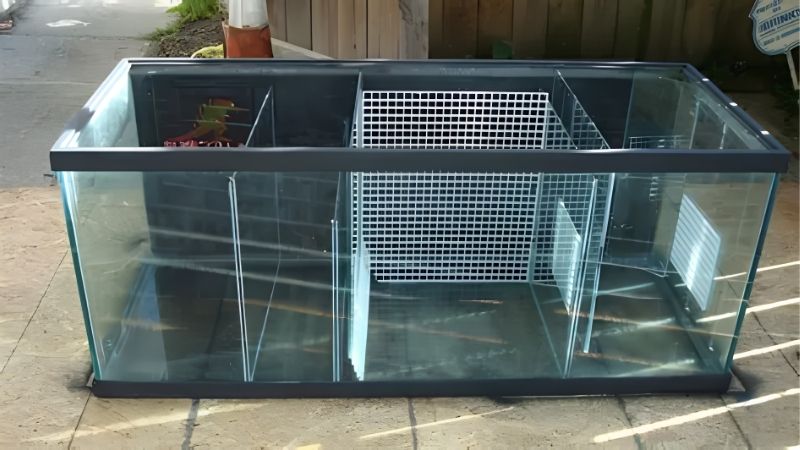
Baffles set water levels, trap bubbles and separate chambers, and those jobs need different geometry. A level-setting baffle is a fixed-height wall water flows over; a bubble trap is three baffles forcing water over, under and over again.
Spacing matters for the trap. Roughly 1 in (2.5 cm) between panels slows flow enough for bubbles to rise out, while wider spacing lets water carry them through and narrower spacing raises velocity and pushes them under.
Panel height sets the levels. The over-baffle height decides the water level in the chamber before it, which is how a skimmer chamber is tuned to a specified depth independently of what the return chamber is doing at the same time.
Design Figures and When Each Needs Attention
The table below sets out the numbers a sump build has to hit, alongside what to change when one is missed. Most are decided once at build time rather than adjusted later, which is why getting them right on paper matters.
| Design figure | Target | Symptom when wrong | Fix |
|---|---|---|---|
| Sump volume | 20-30% of display | Floods on power cut | Lower running level, upsize sump |
| Freeboard when running | 3-4 in (7.6-10 cm) | Overflow at the rim | Lower the return chamber level |
| Drain diameter | 1-1.5 in (25-38 mm) typical | Overflow box floods | Reduce return flow or upsize drain |
| Return flow | 5-10x display per hour | Micro-bubbles, noise | Add a valve, reduce pump speed |
| Head loss allowance | 25-40% of rated GPH | Flow far below expectation | Fewer elbows, wider pipe |
| Bubble trap spacing | About 1 in (2.5 cm) | Bubbles reaching the display | Add a third baffle, slow the flow |
| Return chamber size | Smallest chamber | Level swings widely | Move a baffle, add top-off there |
| Siphon break hole | Just below water line | Return siphons back on power cut | Drill a small hole in the return pipe |
The siphon break row is the cheapest insurance in this whole aquarium sump design guide. A small hole drilled just below the display water line stops the return line siphoning backwards when the pump stops, which can otherwise double drain-down volume.
Applying the Design to a Real Cabinet
Any aquarium sump design guide collides with cabinet geometry more than with anything else. This section covers the measurements that decide feasibility, how the design changes with display size, and the drain options worth knowing about.
Tank Size, Placement and Fit
Measure the cabinet door opening before ordering or building anything, since a sump that fits the internal space but not the doorway cannot be installed. Diagonal entry helps, but only if the sump is shorter than the diagonal clearance.
Check working height too. A skimmer or reactor standing in the sump needs clearance above it for servicing, so usable cabinet height is the internal figure minus the tallest item plus its removal distance.
How Display Size Changes the Design
Under 40 gallons (151 L), a two-chamber sump holding around 10 gallons (38 L) is usually the practical limit, and often not worth the plumbing at all compared with an all-in-one tank using a rear chamber instead.
From 55-90 gallons (208-341 L), a three-chamber sump at 15-25 gallons (57-95 L) is the common arrangement. Above 125 gallons (473 L), the sump becomes large enough to hold reactors, a refugium and a full-size skimmer comfortably.
Freshwater builds scale the same way but use the space differently, filling the middle chambers with mechanical and biological media rather than a skimmer. The volume and freeboard rules are identical, since the physics of a power cut does not change.
Drain Designs and Noise
A single standpipe with an air vent is the simplest arrangement and also the noisiest, since air and water share one pipe. It works reliably enough, and it is clearly audible in a living room, which is the usual reason people move on from it.
Two-pipe and three-pipe designs separate a controlled full siphon from an emergency overflow, which is quieter and safer. The trade is complexity: the siphon needs a valve tuned once at commissioning and checked occasionally afterwards.
The emergency pipe should run dry in normal operation. If water is trickling down it at any point, the primary siphon is partially blocked and the system is already relying on its backup, which is worth checking monthly by eye.
Myths That Produce Bad Sumps
Three assumptions cause most of the sump rebuilds in this hobby, and all three are avoidable at the design stage rather than after the cabinet has been drilled. Each has a measurement that replaces it.
Myth: Fill the Sump to Maximise Volume
Water volume only helps if the sump can accept the drain-down when power fails. A sump filled to the rim holds no reserve at all, so it floods identically to a smaller one running with proper freeboard.
The replacement is a physical test rather than a calculation. Fill the system, run it, then switch the pump off and watch where the level settles. Adjust the running level until that settled level sits comfortably below the rim.
Myth: Buy the Biggest Return Pump That Fits
Return flow above roughly 10 times display volume drives bubbles through the baffles, raises overflow noise and pushes water past the skimmer faster than it can be processed. More is actively worse beyond that point.
Size the pump to the drain instead. Establish what the drain handles quietly, subtract a margin, then allow 25-40% for head loss and choose a pump whose delivered output lands at 5-10 times display volume.
Myth: Baffles Can Go Anywhere
Baffle position sets which chamber holds a fixed level and which one moves with evaporation. Get that wrong and the top-off float sits in a chamber whose level never changes, so it never triggers while salinity or hardness climbs.
Design the return chamber as the smallest and last section, and put every level-dependent device in it. That single rule prevents the most common design fault in home-built sumps across both freshwater and marine systems.
Building and Living With It
A sump is built once and lived with for years, so this aquarium sump design guide would be incomplete without the maintenance pattern and the failures that appear long after commissioning.
Commissioning and the Tests to Run
Run the system on fresh water for 24-48 hours before adding livestock, checking every joint and baffle for leaks. Then switch the pump off and confirm the drain-down level, and mark the running level on the sump with tape.
Measure actual return flow once by timing the output into a container of known volume. That figure is the baseline against which every future decline is measured, and it is almost always lower than the pump rating suggested.
Write both figures on the sump in permanent marker: the running level and the measured flow. A build documented that way is far easier to troubleshoot two years later, when nobody remembers what the original commissioning numbers were.
What Fails Over Time
Return pumps lose flow as deposits build on the impeller, silicone joints on home-built sumps can weep at the baffles, and standpipes partially block with algae or coralline, which raises the display level and eats the safety margin.
Check baffle chamber levels against each other monthly. A slow leak through a failing baffle joint shows first as two chambers disagreeing rather than as visible water, and it is far easier to fix before it becomes a crack.
Running Cost and Timing
Ongoing spend is filter socks or roll media, an occasional impeller and the electricity for a pump running continuously. A sump adds a modest amount to a system’s power draw, and an oversized pump adds considerably more.
On timing, sumps, pumps and plumbing components discount most deeply in late June and again in late November, which suits a planned build. A sale changes nothing biological, and prices move constantly, so check at the moment of purchase.
Aquarium Sump Design Guide Questions
These arrive at the planning stage, before anything is drilled. Every answer in this aquarium sump design guide points at a measurement, since sump problems are physical and therefore testable in advance.
Can I use a sump on a freshwater tank?
Yes, and the design principles are identical. Freshwater sumps typically hold mechanical and biological media rather than a skimmer, and they suit heavily stocked tanks where extra volume and hidden equipment both help.
Does the tank need to be drilled?
For a reliable sump, effectively yes. Hang-on overflow boxes rely on a siphon that can break, and a broken siphon means the return pump empties the sump into the display. Drilled overflows fail safe by comparison.
How do I make it quieter?
Move from a single vented standpipe to a two-pipe design with a tuned full siphon, and reduce return flow toward the lower end of the 5-10 times band. Most sump noise is air moving in the drain rather than the pump.
What size pipe should the drain be?
One inch (25 mm) suits displays up to about 75 gallons (284 L) at typical return rates, and 1.5 in (38 mm) above that. Size the drain first, then the pump, since the drain is the harder constraint to change later.
Where should the heater go?
In the chamber with the highest flow, fully submerged and below the lowest running level. That keeps it out of the display and ensures it cannot run exposed if the return chamber level drops between top-ups.
See More:
Conclusion
This aquarium sump design guide reduces to five figures: sump at 20-30% of display volume, 3-4 in (7.6-10 cm) of freeboard, return flow at 5-10 times display after a 25-40% head loss allowance, and bubble-trap baffles about 1 in (2.5 cm) apart.
Size the drain before the pump, put the return chamber last and smallest with every level-dependent device in it, drill a siphon break in the return line, and test the power-off level physically before any livestock goes in.
Best Aquarium Sump for Freshwater Tanks: Top Expert Guide

6 Best Bio Filters For Aquarium 2026