Last Updated: October 4, 2026
A protein skimmer cup collects concentrated organic waste, so it can become sticky, foul-smelling, and difficult to remove quickly. Learning how to clean protein skimmer cup components correctly helps the skimmer work consistently and keeps odors from spreading through the room. Done poorly, cleaning can leave soap residue, damage acrylic or rubber seals, clog the drain, or cause the skimmer to overflow when it is returned to the aquarium.
The safest approach is simple: remove the cup, empty it, rinse away loose waste, soak mineral deposits in diluted white vinegar, scrub with aquarium-safe tools, and rinse thoroughly with fresh water. This guide explains the process for most saltwater aquarium skimmers in 2026, including removable collection cups with drain fittings, lids, and necks.
As an Amazon Associate we earn from qualifying purchases at no extra cost to you.

Quick answer: Our top pick in 2026 is the Gloves — our #1 rated choice. See the full ranked comparison, alternatives and buying advice below.
What You Need
| Item | Why | Optional? |
|---|---|---|
| Gloves | Protects your hands from concentrated waste, saltwater, and sharp plastic edges. | No |
| Bucket or plastic tub | Contains drips and provides a place to soak the cup and removable parts. | No |
| Fresh tap water | Rinses away waste and vinegar. Use dechlorinated water for the final rinse if your manufacturer recommends it. | No |
| Plain white vinegar | Dissolves calcium and salt deposits without using detergents. | No, if there is no mineral buildup |
| Soft sponge, bottle brush, and old toothbrush | Cleans the cup walls, neck, lid, drain port, and small grooves. | No |
| Plastic scraper or old plastic card | Lifts stubborn deposits without scratching acrylic. | Yes |
| Clean towel | Dries the outside of the cup and catches drips during reassembly. | Yes |
| Replacement drain plug or gasket | Restores a leak-free seal if the original plug is cracked, hardened, or missing. | Yes |
Do not use dish soap, bleach, glass cleaner, abrasive powder, steel wool, or scented cleaners. Even a small amount of detergent can destabilize foam production and may introduce unwanted chemicals into the aquarium.
Step-by-Step
-
Turn off the skimmer and prepare the area (5 minutes)
Unplug the skimmer pump or switch it off at the aquarium controller. If the skimmer is connected to an automatic neck cleaner, dosing system, or waste container, disable those devices temporarily. Place a bucket or towel beneath the skimmer before lifting the cup.
Let the cup sit for a minute so foam and liquid settle. If the cup is unusually full, remove some liquid with a disposable cup first. Avoid allowing concentrated skimmate to spill into the aquarium.
-
Remove and empty the collection cup (3 minutes)
Wear gloves and lift the cup straight up when possible. Some models twist, latch, or use a bayonet-style fitting, so do not force it. Empty the contents into a household drain or designated waste container, following local wastewater rules.
If the cup has a drain fitting, inspect the plug, tubing connection, and gasket before rinsing. Set small parts in a bowl so they do not disappear down a sink drain.
-
Rinse away loose waste (2 to 5 minutes)
Rinse the cup, lid, neck, and removable fittings under lukewarm water. A moderate stream is enough; very hot water can soften some plastics or stress acrylic seams. Use your fingers or a soft sponge to remove sludge from the cup walls.
Pay special attention to the narrow neck. A dirty neck can change the foam head and contribute to inconsistent skimming. Do not push debris deeper into a drain fitting.
-
Soak mineral deposits in diluted vinegar (15 to 30 minutes)
For white crust, salt scale, or hard calcium deposits, mix one part plain white vinegar with one part water in a bucket. Submerge removable plastic parts and soak them for 15 to 30 minutes. Heavier buildup may need up to 60 minutes, but check the manufacturer’s care instructions first.
Keep electrical components, pumps, air valves, and controllers out of the solution unless their instructions specifically allow cleaning. Vinegar is useful for mineral scale, but it is not a substitute for rinsing organic waste.
-
Scrub the cup and neck gently (5 to 10 minutes)
Use a soft sponge on broad surfaces and a bottle brush inside the neck or drain port. An old toothbrush works well around threads, grooves, and the underside of the lid. For a stubborn spot, loosen the deposit with a plastic scraper or old gift card.
Never use a razor blade, metal scraper, scouring pad, or abrasive cleaner on acrylic. Scratches can collect waste and make the cup harder to clean later. If a gasket comes out during cleaning, inspect it for splits, flattening, or stiffness before reinstalling it.
-
Clean the lid, plug, and drain path (5 minutes)
Rinse the lid separately and clean the vent hole, silencer connection, and drain opening. A blocked vent or drain can cause pressure changes, leaks, or an overflowing cup. Run water through the drain path and confirm that it exits freely.
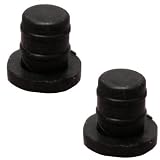
For example, the Reef Octopus Skimmer Cup Replacement Drain Plug 2-Pack is a low-cost replacement option listed at about $10 when an old plug no longer seals. Match the replacement to your exact skimmer model; drain plugs are not universally interchangeable.
-
Rinse thoroughly and dry the outside (3 to 5 minutes)
Rinse every part with clean water until there is no vinegar smell and no visible residue. If your aquarium uses sensitive invertebrates or you have hard tap water, use fresh dechlorinated or purified water for the final rinse.
Dry the outside with a clean towel. The inside does not need to be completely dry, but do not return a part covered in pooled vinegar or loose debris to the aquarium.
-
Reassemble and restart gradually (5 to 15 minutes)
Reinstall the gasket, drain plug, lid, and tubing exactly as they were positioned. Confirm that the cup sits level and that the drain plug is fully seated. Check the cup’s diameter and height against the skimmer body if you are replacing it; even a difference of a few millimeters can prevent a proper fit.
Turn the skimmer back on and watch it for at least 5 to 15 minutes. A freshly cleaned cup or neck can cause temporary foam changes. Keep the skimmer’s water level at the manufacturer’s recommended setting, and do not leave the aquarium unattended until you know it is not overflowing.
Mistakes to Avoid
- Using soap: Detergent residue can cause excessive foam, suppress skimming, or enter the aquarium.
- Pouring vinegar into the aquarium: Clean removable parts in a separate container and rinse them before reinstallation.
- Scraping acrylic with metal: Fine scratches permanently create places for grime to collect.
- Ignoring the drain plug: A tiny leak can empty a waste container or drip onto a cabinet.
- Cleaning only the cup: The neck, lid vent, drain path, and gasket also affect performance.
- Restarting without supervision: Foam behavior may change immediately after cleaning.
- Mixing cleaners: Never combine vinegar with bleach or other chemical products.
How Often
Empty the cup whenever it is about one-half to two-thirds full, or sooner if the waste is unusually wet. Many aquariums need a quick cup rinse every 2 to 7 days. Wipe or scrub the neck at least weekly because residue there can reduce foam contact and make the skimmer less efficient.
Perform a deeper vinegar soak every 4 to 12 weeks, depending on stocking levels, feeding, calcium buildup, and how quickly the cup becomes coated. Clean the lid and drain fittings during the same session. A heavily stocked aquarium may require more frequent cleaning than a lightly stocked system.
When to Call a Pro or Replace
Contact an aquarium professional if the skimmer repeatedly overflows after correct cleaning and adjustment, if saltwater is reaching electrical equipment, or if you cannot identify a leak near the sump. Stop using a cracked cup, warped lid, split drain fitting, or damaged power cord.
Replace the cup when acrylic seams are separating, the mounting collar no longer sits securely, or deep scratches and staining cannot be cleaned. Replacement cups vary considerably by model. As a general reference, a simple drain-plug replacement may cost around $10 to $15, while a complete branded skimmer cup can cost roughly $40 to $80 or more. The Tunze Skimmer Cup Holiday 9004.145, for example, is listed at about $55. Verify the model number, cup dimensions, attachment method, and drain position before buying.
FAQ
Can I clean a protein skimmer cup with dish soap?
No. Dish soap can leave surfactants behind and interfere with foam production. Use water, a soft brush, and diluted plain white vinegar for mineral deposits.
How long should I soak the cup in vinegar?
Start with 15 to 30 minutes in a one-to-one mixture of white vinegar and water. Extend the soak to about 60 minutes for stubborn scale, then scrub and rinse thoroughly.
Why does my skimmer overflow after I clean the cup?
Cleaning removes residue that was changing the foam behavior. The cup may also be seated incorrectly, the water level may be too high, or vinegar residue may remain. Check the fit, rinse again if needed, and monitor the skimmer while it settles.
Should I clean the skimmer cup while it is attached?
For a quick wipe, you can clean the cup in place if no liquid can fall into the aquarium. For rinsing, soaking, or scrubbing, remove it first. Separate cleaning prevents waste, vinegar, and loosened deposits from entering the tank.
Ready to decide? Our #1 pick for 2026 is the Gloves.
Live price & availability on Amazon.
Related Reviews & Guides

Fish Staying at Bottom of Tank: Read the Water Numbers First
6 Best Stands For 50 Gallon Fish Tank 2026