Last Updated: September 25, 2026
The first move is to fill the siphon path with the primer before running the motor, not to plug in an empty canister and hope the impeller pulls water. Knowing how to prime a canister filter correctly on a Fluval 07 means opening the AquaStop fully, submerging the intake, raising the output slightly, and pumping the primer 3-4 times.
As an Amazon Associate we earn from qualifying purchases.
As an Amazon Associate we earn from qualifying purchases at no extra cost to you. Prices and availability are accurate as of the date shown and are subject to change.

External Canister Filter, Ultra‑Quiet Aquarium Filter with Complete Filter Media, Freshwater & Saltwater for 40‑55‑66 Gallon Fish Tanks (CY‑650)
Selected for "How to Prime a Canister Filter Correctly: Best Proven Way": this listing is filtration (External Canister Filter, Ultra‑Quiet Aquarium Filter with Complete Fi), matching the equipment this article covers.
View on Amazon
VEVOR 224.5GPH Canister Filter, 3-Stage External Aquarium Filter with Powerful Pump, Quite Water Circulation Cleaning Machine with Media for Fish Tanks and Aquariums Up to 55 Gallons, for Freshwater
Selected for "How to Prime a Canister Filter Correctly: Best Proven Way": this listing is filtration (VEVOR 224.5GPH Canister Filter, 3-Stage External Aquarium Filter with ), matching the equipment this article covers.
View on Amazon
fishkeeper 390GPH Canister Filter, 3-Stage Filtration Aquarium Filter
Selected for "How to Prime a Canister Filter Correctly: Best Proven Way": this listing is filtration (fishkeeper 390GPH Canister Filter, 3-Stage Filtration Aquarium Filter), matching the equipment this article covers.
View on Amazon
VEVOR 396GPH Canister Filter, 4-Stage External Aquarium Filter with Powerful Pump, Water Circulation Cleaning Machine with Media for Large Fish Tanks and Aquariums Up to 125 Gallons, for Freshwater
Selected for "How to Prime a Canister Filter Correctly: Best Proven Way": this listing is filtration (VEVOR 396GPH Canister Filter, 4-Stage External Aquarium Filter with Po), matching the equipment this article covers.
View on AmazonBy David Nguyen
Find the Cause
Before fixing anything, check the four things that stop a canister from priming: trapped air, an intake that is not submerged, closed shutoff valves, and air being pulled into the intake. Diagnosing which one applies tells you where to act, since a filter that will not draw water usually has one of these specific causes.
Check Whether the Canister Is Full of Air
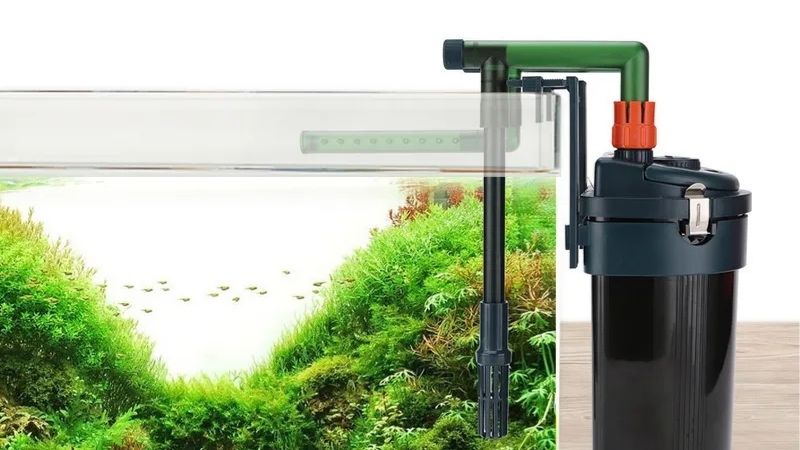
Air trapped inside the canister is the most common reason a filter will not start. Fluval specifically expects air to leave through the output before power-on, so if the unit is noisy or not drawing water, a large air pocket that has not been expelled is the first thing to check.
Look and listen at the output during priming; steady bubbling means air is still clearing. Powering on before that air escapes leaves the impeller spinning against an air pocket, so confirm the canister has filled and vented before you connect power rather than assuming it is ready.
Check the Intake
The intake must be fully submerged on the Fluval 07 for the siphon to establish. If the strainer sits at or above the water line, the filter draws air instead of water and cannot prime, so verify the intake is well below the surface before troubleshooting anything else.
A dropping water level or a shifted intake can break the siphon after the fact too. Check that the strainer stays submerged during normal running, because an intake that occasionally surfaces will pull air and cause the same priming and bubbling problems repeatedly.
Check the Shutoff Valves
The AquaStop valve must be fully open before priming or starting. If it is partially closed, the siphon is restricted and the primer cannot fill the canister, so confirm the valve is all the way open as the first mechanical check on a Fluval 07.
A partly closed valve is easy to overlook after maintenance, when the unit is often reassembled with the lever not fully seated. Open it completely before pumping the primer, since a restricted siphon mimics other faults and wastes time chasing the wrong cause.
Check for Air Being Pulled Into the Intake
Persistent bubbling can come from air entering near the intake. Fluval recommends keeping an airstone at least 6 inches, preferably about 12 inches, away from the intake, so that rising bubbles are not drawn into the siphon path and carried into the canister.
If bubbles keep appearing after priming, look for an air source close to the strainer. Repositioning the airstone to that 6-to-12-inch clearance often resolves ongoing air ingestion, since the intake will otherwise keep pulling in the bubble stream and reintroducing air to the system.
Fix It Step by Step
Once you know the cause, prime in order: open the water path, raise the output, pump the primer, then power on after bubbling stops. The table lays out each step with its verified number or condition and what to watch, and the sections below walk through them in sequence for a Fluval 07.
| Step | Action | Verified Number / Condition | Watch Out For |
|---|---|---|---|
| 1 | Open valves and submerge intake | AquaStop 100% open | Restricted siphon |
| 2 | Position outlet | Slightly above surface | Helps vent air |
| 3 | Operate primer | Fluval: 3-4 strokes | OASE only says “few presses” |
| 4 | Wait, then power on | Plug in after bubbling stops | Do not dry-run |
Step 1: Open the Water Path
Start by opening the AquaStop fully, all the way down and open, and making sure the intake is completely underwater. This establishes an unrestricted siphon path so the primer can actually draw water into the canister rather than fighting a closed valve or a surfaced strainer.
With the valve open and the intake submerged, the filter is ready to fill. Skipping this step is the most common reason priming fails, so confirm both conditions before touching the primer, since a restricted path prevents the canister from taking on water at all.
Step 2: Raise the Output During Priming
Position the output slightly above the water surface during priming, as Fluval advises. Raising the outlet helps trapped air vent out of the canister as water enters, so the air pocket is pushed out through the return rather than staying inside the media chamber.
This small adjustment makes the air clear faster and more completely. Once the canister has filled and vented, you can return the outlet to its normal position, but keeping it slightly high during priming gives the air an easy path out of the sealed loop.
Step 3: Pump the Primer
On the Fluval 07, operate the primer 3 to 4 complete strokes until water begins drawing into the canister. That 3 to 4 figure is specific to the verified Fluval 07 procedure and should not be treated as a universal number for every brand of canister filter.
The OASE BioMaster, by contrast, says only to give the primer a few presses rather than a set count, so follow each maker’s own instruction. Do not invent a stroke count for OASE; use the manufacturer’s wording, since primer mechanisms and their required actions differ between brands.
Step 4: Wait for Air to Clear Before Powering On
After pumping, wait until the priming bubbles stop. Fluval’s sequence treats that as the sign the canister is full and the air has been expelled, and only then should you connect power to the unit rather than plugging it in while air is still venting.
Powering on too early runs the impeller against trapped air, which is noisy and can strain a dry pump. Let the bubbling finish first, since patience here protects the motor and ensures the filter starts moving water immediately rather than churning against an air pocket.
Frequently Asked Questions
Owners ask how many primer pumps a Fluval needs, why a filter keeps blowing bubbles, whether they can plug in early, and how often to inspect hoses. The answers below stay with each manufacturer’s verified guidance, since a step that is right for one brand’s primer may not transfer to another.
How Many Times Should I Pump the Fluval Primer?
The Fluval 07 Series instructions call for pumping the primer 3 to 4 times, until water begins drawing into the canister. That range is specific to the 07 procedure and is the figure to follow for those units rather than a guessed count.
Do not apply that 3 to 4 number to other brands, since primer designs differ. OASE, for example, only says to give a few presses, so match the stroke count to your exact model’s manual rather than assuming every canister uses the same priming action.
Why Does My Canister Filter Keep Blowing Bubbles?
Ongoing bubbles usually mean air is entering the intake path. Fluval recommends keeping an airstone at least 6 inches, preferably about 12 inches, away from the intake, so rising bubbles are not pulled into the siphon and carried through the canister.
Check for any air source near the strainer, including a shifted airstone or a partly surfaced intake. Repositioning the air supply to that clearance, and confirming the intake stays submerged, typically stops the persistent bubbling rather than repeated re-priming alone.
Can I Plug the Filter In Before It Is Full?
Fluval’s sequence is to wait until the priming bubbles stop, then power the unit. Plugging in before the canister has filled runs the impeller against trapped air, which is noisy and can stress a dry-running pump, so the wait is part of the correct procedure.
Let the air finish venting through the raised output first. Once bubbling ceases and the canister is full, connecting power starts water movement immediately, which is easier on the motor than energizing it into an air pocket that has not cleared.
How Often Should I Inspect Fluval Hose Connectors?
Fluval’s best-practice guidance suggests inspecting the rubber hose connectors about once per year. Regular checks catch aging or loose connectors before they leak or admit air, which helps priming stay reliable over the life of the filter.
Pair that yearly inspection with normal maintenance so worn seals are replaced before they cause problems. A connector that lets in air can mimic a priming fault, so keeping the hose fittings sound is part of ensuring the canister primes cleanly each time.
Final Thoughts
Knowing how to prime a canister filter correctly comes down to following your unit’s exact manufacturer sequence, because primer mechanisms differ between brands. Fill the siphon path first, open the valve, submerge the intake, pump the primer the number of times your model specifies, and power on only after the bubbling stops so the motor never runs dry.
Related Reviews & Guides



Common Mistakes When Buying an Aquarium Controller: Best
Best Temperature Controller for Chiller and Heater: Top Pick