Last Updated: October 4, 2026
A sponge filter is simple, inexpensive, and especially useful in shrimp tanks, fry tanks, betta setups, and small community aquariums. But it works because beneficial bacteria live throughout the sponge—not because the sponge looks clean. If you clean it the wrong way, especially by rinsing it under untreated tap water or replacing all filter media at once, you can reduce the bacteria that process fish waste. That can lead to cloudy water, ammonia or nitrite spikes, stressed fish, and a tank that suddenly needs to cycle again.
The goal when learning how to clean aquarium sponge filter media is not to make it look brand-new. It is to remove enough trapped debris that water and air can move freely through it while preserving as much established bacteria as possible. In 2026, sponge filters remain a practical low-tech filtration choice because routine care takes only a few minutes and requires very little equipment.
As an Amazon Associate we earn from qualifying purchases at no extra cost to you.

Quick answer: Our top pick in 2026 is the Clean bucket or bowl, 1 to 3 gallons — our #1 rated choice. See the full ranked comparison, alternatives and buying advice below.
What You Need
| Item | Why | Optional? |
|---|---|---|
| Clean bucket or bowl, 1 to 3 gallons | Holds old aquarium water for rinsing the sponge safely. | No |
| Dechlorinated replacement water | Refills the aquarium after water removal. | No |
| Water conditioner | Neutralizes chlorine and chloramine in new tap water. | Usually |
| Small siphon or gravel vacuum | Removes old tank water and loose waste during a water change. | Recommended |
| Soft aquarium brush or small bottle brush | Cleans the uplift tube, air tubing, and outer plastic parts. | Yes |
| Replacement airline tubing | Useful if existing tubing is hard, cracked, algae-coated, or leaking. | Yes |
| Replacement sponge media | Needed only when the sponge is breaking down or cannot pass water. | Yes |
Choose a bucket that has never held soap, bleach, household cleaners, or lawn chemicals. Even small residues can harm aquarium animals. A dedicated aquarium bucket is best.
Step-by-Step
1. Check the filter’s airflow and tank conditions (2 minutes)
Before taking anything apart, look at the bubbles leaving the uplift tube. A sponge filter should produce a steady stream, though the exact bubble size and volume depend on the air pump and air stone. Weak or irregular bubbling may mean the sponge is clogged, but it can also indicate a kinked airline, a blocked air stone, or a failing pump diaphragm.
Also check the aquarium water level. If the water is unusually low, top it up only with properly conditioned water after cleaning. Never run an air pump in a location where water could siphon backward into it during a power outage. Keep the pump above the water line when possible, or use a check valve installed in the correct direction.
2. Remove 20% to 30% of the aquarium water (5 to 10 minutes)
During a normal maintenance session, siphon roughly 20% to 30% of the tank water into your clean bucket. For a 10-gallon aquarium, that means about 2 to 3 gallons. This water will be used to rinse the sponge.
Vacuum visible debris from open areas of the substrate, but do not aggressively deep-clean every inch of gravel if the tank has been neglected for a long time. A gradual cleanup is easier on the aquarium’s biological balance. Save enough removed water in the bucket to submerge the sponge completely.
3. Turn off the air pump and remove the sponge filter (2 minutes)
Unplug the air pump before removing the filter. Lift the sponge filter straight up and keep it over the aquarium for a few seconds so excess water drains back into the tank. Then place it in the bucket of old aquarium water.
If the sponge filter is secured with suction cups, release them gently rather than pulling hard on the uplift tube. Older suction cups can become stiff and may need replacement if they no longer hold the filter upright.
4. Gently squeeze the sponge in old tank water (3 to 5 minutes)
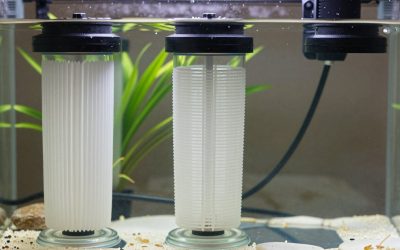
Submerge the sponge and squeeze it several times in the bucket water. The water may turn brown or gray as trapped mulm releases. This is normal. Continue until the sponge is less clogged and water can move through it more easily, but stop before trying to make it spotless.
Do not rinse the sponge under untreated tap water. Chlorine and chloramine can damage beneficial bacteria, and hot water can make the problem worse. Do not use dish soap, vinegar, peroxide, bleach, disinfectant sprays, or laundry products on the sponge.
For dense replacement sheets, such as bio filter foam pads cut to fit a filter compartment, use the same approach: swish and gently compress the foam in discarded aquarium water. A foam sheet around 12 by 12 inches can often be trimmed with dedicated clean scissors, but measure the filter chamber first and avoid packing foam so tightly that flow is restricted.
5. Clean the uplift tube and air components separately (3 to 5 minutes)
Remove the uplift tube, air stone, and any removable plastic frame according to the filter’s design. Swish these parts in the old aquarium water and use a small brush to clear algae or debris from the tube. A blocked tube can reduce circulation even when the sponge itself is clean.
Inspect airline tubing for bends, trapped water, loose connections, and brittle sections. Airline is inexpensive, so replacing a damaged 3/16-inch standard airline section is often more reliable than trying to patch it. If an air stone produces weak bubbles after cleaning, replace it rather than increasing pump power unnecessarily.
6. Reassemble and return the filter to the aquarium (2 to 3 minutes)
Put the sponge, tube, and air components back together. Position the sponge filter where it will not be buried in substrate or blocked by hardscape. The top of the uplift tube should sit near the water surface to create gentle circulation and surface movement.
Reconnect the airline, restore power to the air pump, and confirm that bubbles travel through the tube. If the filter does not restart within 30 to 60 seconds, check for a pinched airline, a disconnected tube, or an air stone pushed too tightly into the assembly.
7. Refill the tank and monitor it (5 to 10 minutes)
Refill the aquarium with temperature-matched, dechlorinated water. Aim to keep replacement water within about 2°F of the tank temperature, especially in small aquariums where sudden changes are more noticeable. For most routine cleanings, a water change of 20% to 30% is enough.
Over the next day, watch fish for rapid breathing, unusual surface-gasping, clamped fins, or lethargy. These signs do not automatically mean the sponge cleaning caused a problem, but they warrant a water test for ammonia and nitrite.
Mistakes to Avoid
- Rinsing media under the faucet: Untreated tap water can harm the bacteria that make the filter biologically useful.
- Replacing the entire sponge on a schedule: Replace only when it is deteriorating, misshapen, or permanently clogged. A brown sponge is not necessarily a bad sponge.
- Cleaning every filter and the entire substrate at once: Spread major maintenance across different days when possible.
- Using soap or household cleaners: Aquarium equipment should be cleaned only with aquarium-safe methods and dedicated tools.
- Ignoring weak bubbles: The problem may be the pump, tubing, check valve, or air stone—not just the sponge.
- Overstocking a small sponge filter: A small nano sponge filter may be appropriate for a lightly stocked 5- to 10-gallon tank, but a heavier bioload needs more filtration and aeration.
How Often
Most aquarium sponge filters need cleaning every 2 to 4 weeks. In a lightly stocked shrimp tank or planted aquarium, once every 4 to 6 weeks may be enough. In a heavily stocked tank, fry grow-out setup, or aquarium with messy fish, the sponge may need attention every 1 to 2 weeks.
Use performance rather than the calendar alone. Clean the sponge when bubble output drops, flow from the uplift tube weakens, debris visibly coats the sponge, or the filter begins collecting so much waste that it affects circulation. Avoid cleaning it more frequently than needed.
If you run two sponge filters, clean only one at a time and wait 1 to 2 weeks before cleaning the other. This leaves an undisturbed colony of beneficial bacteria in the aquarium.
When to Call a Pro or Replace
Call an aquarium maintenance professional or an experienced local fish store if fish are dying, ammonia or nitrite remains detectable after water changes, the tank has persistent foul odors, or the filter repeatedly stops despite new tubing and an air stone. A professional can help assess stocking levels, oxygenation, water chemistry, and whether the system has lost its biological cycle.
Replace the sponge when it tears easily, sheds foam particles, has collapsed so much that it no longer fits the frame, or remains severely restricted after gentle rinsing. Do not replace every piece of biological media at once. If possible, run the new sponge alongside the old one for 2 to 4 weeks, or place the old sponge near the new media so bacteria can transfer.
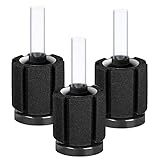
Basic replacement foam pads commonly cost about $7 to $10, while small multi-pack nano sponge filters are often around $6 to $12. Match the sponge size and pore density to the filter body and aquarium load rather than choosing only by price.
FAQ
Can I clean an aquarium sponge filter with tap water?
Not unless the water has been treated with a conditioner that neutralizes chlorine and chloramine. The safer standard method is to rinse and squeeze the sponge in old aquarium water removed during a water change.
Should my sponge filter look completely clean after washing?
No. A healthy sponge filter often remains stained brown or green. Remove the loose debris that is blocking flow, but do not scrub it until it looks new. Preserving established bacteria matters more than appearance.
How do I know whether the sponge or air pump is the problem?
Clean the sponge first, then check the airline for kinks and inspect the air stone. If bubbles are still weak, disconnect the tubing from the filter and test airflow from the pump alone. Little or no airflow at that point suggests a pump, diaphragm, or tubing issue.
Can I use a sponge filter in a betta or shrimp tank?
Yes. Sponge filters are popular for bettas, shrimp, fry, and small fish because they provide gentle filtration and are less likely to pull tiny animals into an intake. Select a size appropriate for the aquarium, and use an adjustable air valve if the current is too strong for a betta.
Ready to decide? Our #1 pick for 2026 is the Clean bucket or bowl, 1 to 3 gallons.
Live price & availability on Amazon.
Related Reviews & Guides

Best Small Aquarium Under 5 Gallons: Best Compared Buyer Guide
5 Best Fish Tank Heaters for Beginners (2026)