Last Updated: October 4, 2026
A sponge filter is simple, quiet, and especially useful in shrimp, fry, betta, and nano tanks—but it only works well when it is cleaned the right way. The biggest mistake is rinsing the sponge under chlorinated tap water or replacing all of its foam at once. Either can remove much of the beneficial bacteria that process fish waste, potentially leading to an ammonia or nitrite spike. On the other hand, leaving a sponge filter clogged with debris reduces water flow, oxygen exchange, and filtration. The goal is not to make the sponge look brand-new; it is to restore steady bubbles and water movement while preserving its established bacterial colony.
This method works for common air-driven sponge filters, including compact models used in tanks under 10 gallons and larger dual-sponge styles. In 2026, many replacement foam pads and small sponge-filter sets cost roughly $7 to $10, but routine maintenance can help one sponge last for months or longer before replacement is needed.
As an Amazon Associate we earn from qualifying purchases at no extra cost to you.

Quick answer: Our top pick in 2026 is the Clean bucket, 1 to 3 gallons — our #1 rated choice. See the full ranked comparison, alternatives and buying advice below.
What You Need
| Item | Why | Optional? |
|---|---|---|
| Clean bucket, 1 to 3 gallons | Holds removed aquarium water for safely rinsing the sponge. | No |
| Gravel vacuum or siphon | Removes tank water during a regular water change and helps collect debris. | Recommended |
| Dechlorinator | Treats fresh tap water before it goes into the aquarium. | No, if adding tap water |
| Soft aquarium brush or clean toothbrush | Gently cleans the uplift tube, air line connection, and exterior plastic parts. | Yes |
| Airline tubing and check valve | Useful if old tubing is cracked, stiff, leaking, or clogged. | Yes |
| Replacement sponge or foam pad | Needed only when existing foam is crumbling, permanently compacted, or torn. | Yes |
| Small towel | Catches drips and protects the floor or aquarium stand. | Yes |
Use a bucket reserved for aquarium work. It should never have held soap, bleach, household cleaner, or detergent. Even small residues can harm fish and invertebrates.
Step-by-Step
1. Prepare for a partial water change (5 minutes)
Start by gathering your bucket, siphon, towel, and dechlorinator. Plan to remove about 20% to 30% of the aquarium water. For example, remove 2 to 3 gallons from a 10-gallon tank or 4 to 6 gallons from a 20-gallon tank.
Unplug the air pump before handling the filter. This protects the pump from moisture and stops the sponge filter from splashing while you lift it out. If the pump is positioned below the aquarium’s water line, make sure the airline has a working check valve to prevent back-siphoning during a power interruption.
2. Fill a bucket with old tank water (5 to 10 minutes)
Use a siphon or gravel vacuum to remove aquarium water into the clean bucket. This old water is what you will use to rinse the sponge. It contains no chlorine or chloramine, and its temperature and chemistry are already close to the conditions inside the tank.
Do not use fresh tap water to rinse the foam, even if you plan to add dechlorinator afterward. Chlorine and chloramine can damage the helpful bacteria living throughout the sponge’s pores. Avoid using hot water as well; high temperatures can also harm bacterial colonies and may warp lightweight plastic filter parts.
3. Remove the sponge filter carefully (2 minutes)
Lift the filter slowly from the aquarium and keep it over the tank for a moment to let excess water drain back in. Move it directly to the bucket of old aquarium water. If your model has a weighted base, support it from underneath rather than pulling only on the uplift tube.
For a dual-sponge filter, clean only one sponge at a time if the tank is heavily stocked, newly established, or has no other mature filter media. Leaving the second sponge untouched provides an extra margin of biological stability.
4. Gently squeeze and swish the sponge (3 to 5 minutes)
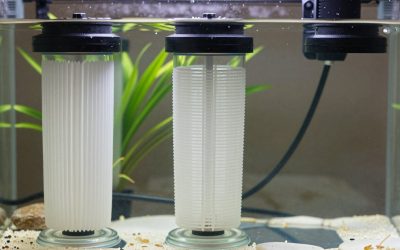
Submerge the sponge fully in the bucket. Squeeze it gently several times, then swish it through the water. You will see brown or gray debris cloud the bucket. That is normal. Continue until the sponge releases most loose buildup and water can move through it more freely.
Do not wring, twist, scrub aggressively, or try to return the foam to its original color. A seasoned sponge commonly remains tan or brown even after proper cleaning. That color alone does not mean it is dirty or unsafe. Stop once you have restored flow and removed the heavy sludge.
If the bucket water becomes extremely dark, you can use a second small bucket of removed aquarium water for one final gentle rinse. Do not keep rinsing until the water runs clear; that level of cleaning is unnecessary and can remove more biofilm than needed.
5. Clean the plastic components and air path (3 to 5 minutes)
Inspect the uplift tube, intake openings, air stone or diffuser, and airline connection. Use a soft brush only on plastic parts where debris is visible. Rinse those pieces in the same old tank water. If the uplift tube is blocked, run water through it or use a narrow aquarium brush to clear the obstruction.
Check the airline tubing for kinks, algae buildup, loose connections, or brittleness. A weak bubble stream is not always caused by the sponge. It may indicate a clogged air stone, failing diaphragm pump, pinched tubing, or an air leak around a connector.
6. Reassemble and return the filter (2 to 3 minutes)
Fit the sponge securely back onto its frame or uplift tube. Place the filter upright in the aquarium, ideally where gentle circulation can carry suspended debris toward it. Make sure the outlet sits below the water surface if you want quieter operation, or position it just at the surface for more agitation and gas exchange.
Reconnect the airline, plug in the air pump, and watch the bubbles for 30 to 60 seconds. You should see a steady stream rising through the uplift tube. A sponge filter does not need violent bubbling; consistent movement is more important than maximum air pressure.
7. Refill the aquarium and monitor it (10 minutes)
Refill with temperature-matched, dechlorinated water. Aim to keep replacement water within about 2°F of the tank’s current temperature, especially in small aquariums where sudden changes are more noticeable. Add water slowly so you do not disturb substrate, plants, shrimp, or fry.
Over the next day, check that the filter is still bubbling normally and that fish are behaving as usual. If the aquarium has been unstable, overcrowded, or recently medicated, test ammonia and nitrite after maintenance. Both should remain at 0 ppm in a cycled freshwater aquarium.
Mistakes to Avoid
- Rinsing the sponge under untreated tap water. This can harm beneficial bacteria and disrupt biological filtration.
- Replacing every sponge at once. Replace one piece at a time on multi-sponge units, allowing several weeks for bacteria to colonize the new foam.
- Over-cleaning. A sponge should be free-flowing, not bright white. Some staining and biofilm are normal.
- Using soap, vinegar, bleach, or household disinfectants. These products do not belong on sponge media that will return to a stocked aquarium.
- Cleaning on a fixed schedule without checking flow. Tank size, feeding level, substrate, and livestock determine how quickly a sponge clogs.
- Ignoring a weak bubble stream. Check the pump, air stone, tubing, and check valve before assuming the sponge itself is the problem.
- Removing the filter for too long. Keep the sponge wet in aquarium water and return it promptly, particularly in warm, heavily stocked tanks.
How Often
Most sponge filters need cleaning every 2 to 4 weeks, usually during a partial water change. In a lightly stocked shrimp tank or planted aquarium, cleaning every 4 to 6 weeks may be enough. In a heavily stocked tank, fry grow-out tank, goldfish tank, or aquarium with messy eaters, inspect the sponge weekly and clean it whenever bubble output or water flow noticeably slows.
A simple rule: clean the sponge when it is restricting flow, not simply because the calendar says it is time. If bubbles rise strongly through the uplift tube and the sponge is not coated in thick debris, leave it alone.
When to Call a Pro or Replace
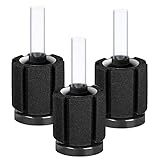
Replace the foam when it is crumbling, split around the center opening, unable to hold its shape, or remains badly compacted after a gentle rinse. Replacement pads are often inexpensive: basic foam media, such as ALEGI-style filter pads, may cost around $8 to $9, while small three-pack sponge-filter sets for nano tanks can cost roughly $7 to $8. Choose replacement foam sized to fit your filter frame rather than forcing a too-small or overly dense sponge into place.
If possible, seed a new sponge by running it beside the old one for 2 to 4 weeks. On a dual-sponge model, replace one side first and wait before changing the other. This reduces the risk of a biological filter crash.
Call an aquarium maintenance professional or experienced aquatic retailer if fish are gasping at the surface, ammonia or nitrite is above 0 ppm, the tank has recurring cloudy water despite maintenance, or the air system repeatedly fails. Immediate help is also sensible for large aquariums, saltwater systems, or tanks with valuable fish when filtration stops unexpectedly.
FAQ
Can I clean an aquarium sponge filter in tap water if I use dechlorinator?
No. Dechlorinator is useful for treating new water before it enters the aquarium, but it is best not to expose established sponge media to untreated tap water in the first place. Rinse the sponge in water removed from the aquarium during a water change.
Should I replace my sponge filter when it turns brown?
No. Brown discoloration is normal and often reflects harmless biofilm, algae staining, and established bacteria. Replace the sponge only when the foam is physically breaking down, torn, permanently compressed, or unable to pass adequate water after gentle cleaning.
Why is my sponge filter bubbling weakly after cleaning?
Check that the sponge is seated correctly and that the uplift tube is clear. Then inspect the airline for kinks or loose fittings, clean or replace a clogged air stone, and confirm that the air pump is strong enough for the tank depth. A small pump may struggle to push air to the bottom of a tall aquarium.
Can I clean the sponge and change water on the same day?
Yes. In fact, that is the preferred method because the water removed during the partial change becomes your sponge-rinsing water. Keep the water change moderate—typically 20% to 30%—and avoid simultaneously replacing all filter media, deep-cleaning every surface, and making major changes to the aquarium’s stocking or chemistry.
Ready to decide? Our #1 pick for 2026 is the Clean bucket, 1 to 3 gallons.
Live price & availability on Amazon.
Related Reviews & Guides
Bristlenose Pleco Tank Mates: Bottom-Space Compatibility
How to Calibrate Aquarium Heater Thermostat (2026): Step-by-Step