Last Updated: October 4, 2026
A canister filter keeps aquarium water clear by moving it through mechanical, biological, and sometimes chemical media outside the tank. But cleaning it incorrectly can cause more problems than a little mulm in the hoses. Rinsing every basket under chlorinated tap water, replacing all media at once, or reconnecting a poorly seated gasket can remove beneficial bacteria, trigger cloudy water, cause leaks, or leave the filter struggling to restart.
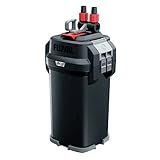
The goal is not to make every part sterile. It is to remove debris that restricts flow while preserving the established biological media that helps process fish waste. This method works for common external canister filters, including compact units for smaller tanks and models such as the Fluval 207, designed for aquariums up to 45 gallons. In 2026, many canister filters include quick-disconnect valves and media baskets, but the basic cleaning principles remain the same.
As an Amazon Associate we earn from qualifying purchases at no extra cost to you.

Quick answer: Our top pick in 2026 is the Clean bucket, 3 to 5 gallons — our #1 rated choice. See the full ranked comparison, alternatives and buying advice below.
What You Need
| Item | Why | Optional? |
|---|---|---|
| Clean bucket, 3 to 5 gallons | Holds removed aquarium water for rinsing filter media safely. | No |
| Aquarium water siphon or hose | Lets you remove tank water and perform a partial water change at the same time. | No |
| Old towels | Catches drips from hoses, the canister lid, and media baskets. | No |
| Soft filter brush or bottle brush | Scrubs the impeller well, intake tube, and hose interiors without scratching them. | No |
| Small toothbrush | Reaches the impeller cover, intake strainer, and narrow crevices. | Yes |
| Dechlorinator | Treats fresh replacement water before it enters the aquarium. | No |
| Silicone lubricant made for aquarium O-rings | Helps maintain the lid gasket and can reduce the risk of air leaks. | Yes |
| Replacement filter floss or sponge | Useful only when existing mechanical media is falling apart or will not rinse clean. | Yes |
Step-by-Step
-
Prepare the work area and save aquarium water (10 minutes)
Unplug the canister filter before touching its valves or opening the housing. Lay towels around the filter cabinet or stand, then place a bucket nearby. During a normal partial water change, siphon 2 to 5 gallons of aquarium water into the bucket. This old tank water is what you will use to rinse sponges and biological media.
Avoid soap, household disinfectants, and scented cleaning sprays anywhere near the filter parts. Even small residues can be harmful to fish and invertebrates.
-
Shut off the water flow and disconnect the filter (5 minutes)
Close the intake and output valves according to your filter’s design. On units with a quick-disconnect block, close both valves first, then release the block from the filter head. Keep the hose assembly upright as you move it so water does not spill from the lines.
If your model uses separate hose connections rather than a single valve block, place a towel beneath each connection and remove them slowly. Carry the canister to a sink, bathtub, laundry room, or protected work surface.
-
Open the canister and inspect the media layout (5 minutes)
Release the lid clamps evenly. Lift the motor head straight up and set it on a towel with the underside facing up. Before pulling out baskets, take a quick photo of the media arrangement. This is especially helpful if your filter has several layers of foam, ceramic rings, activated carbon, or polishing pads.
Most filters work best with coarse mechanical media first, finer mechanical media next, biological media after that, and chemical media last if you use it. Follow the original flow direction indicated by your filter manual.
-
Rinse mechanical media in removed tank water (10 minutes)
Remove foam blocks, coarse sponges, and filter floss. Swish each sponge gently in the bucket of aquarium water and squeeze it a few times until the heaviest debris is released. Do not try to return it to its original bright color; a lightly stained sponge is normal and still useful.
Replace disposable floss only when it remains clogged after rinsing or begins to tear apart. If the filter uses a reusable fine pad, rinse it gently instead. Replacing every layer of mechanical media at once is unnecessary and can reduce the beneficial bacteria living on its surface.
-
Handle biological and chemical media carefully (5 to 10 minutes)
Biological media, such as ceramic rings, porous biomedia, or sintered glass, should receive the lightest cleaning. Dip the basket into the bucket and gently swish it to remove loose sludge. Do not scrub it clean and do not rinse it under untreated tap water.
If you use activated carbon, resin, phosphate remover, or another chemical medium, follow the manufacturer’s replacement schedule. Carbon is commonly changed every few weeks when it is being used to remove medication, odors, or discoloration, but it is not required for every established aquarium. Never replace biological media and all other filter media during the same maintenance session.
-
Clean the canister body, hoses, and intake parts (15 to 20 minutes)
Pour dirty water from the canister body into a drain. Wipe the empty housing with a clean, damp cloth or rinse it with warm water only. Use a long flexible hose brush to remove brown buildup from the intake and output tubing. Algae and biofilm inside hoses can significantly reduce flow even when the media looks clean.
Remove and rinse the intake strainer, spray bar, and outlet nozzle. Clear any blocked holes with a soft brush or wooden toothpick. Do not force metal tools into plastic openings, which can crack or enlarge them.
-
Clean the impeller and gasket (10 minutes)
Open the impeller cover on the underside of the motor head. Pull out the impeller carefully, including its shaft and rubber end caps if present. Use a small brush to clean the impeller well and wipe away slime or grit from the impeller blades. This is one of the most effective ways to reduce rattling, humming, and weak flow.
Inspect the lid O-ring or gasket for twisting, cracks, flattening, or debris. Wipe it clean and apply a very thin film of aquarium-safe silicone lubricant if the manufacturer permits it. Do not use petroleum jelly, cooking oil, or general-purpose grease.
-
Reassemble the filter in the correct order (10 minutes)
Put the media baskets back in their original order, making sure each basket sits flat. Confirm that the center tube or water channel is properly aligned; a misaligned basket can allow water to bypass media or prevent the lid from sealing.
Seat the gasket evenly in its groove, replace the motor head, and close all clamps firmly. Reattach the hose block or individual hoses. Check that both valve levers are fully open before restarting.
-
Prime, restart, and check for leaks (10 minutes)
Prime the filter using its built-in primer, if it has one. Otherwise, follow the manufacturer’s method for filling the canister and hoses with water. Plug the filter in only after it is full enough to avoid running dry. A brief sputter of air is normal; persistent grinding or no flow is not.
Watch the lid, hose connectors, and valve block for at least 10 minutes. Run a dry paper towel around each connection to catch small leaks. Top off the aquarium with temperature-matched, dechlorinated water, then confirm that the output is flowing normally.
Mistakes to Avoid
- Cleaning all media with tap water: Chlorine and chloramine can damage the bacteria colony that supports the nitrogen cycle.
- Replacing every sponge, pad, and biomedia basket at once: Stagger replacements over several maintenance sessions.
- Overcleaning biological media: A gentle swish is enough; it should not look brand-new.
- Ignoring the impeller: Dirty impellers are a common cause of reduced flow and noisy operation.
- Forgetting to lubricate or reseat the gasket: A dry, twisted, or dirty O-ring can cause slow leaks or air intake.
- Restarting with closed valves: This can strain the motor and leave the aquarium without circulation.
- Cleaning a filter during a tank emergency unless necessary: If fish are already stressed by ammonia, medication, or a major water-quality issue, preserve as much established media as possible.
How Often
For most stocked freshwater aquariums, clean a canister filter every 4 to 8 weeks. Tanks with heavy fish loads, messy goldfish, large cichlids, or lots of fine debris may need service every 2 to 4 weeks. Lightly stocked planted tanks can often go 8 to 12 weeks between full canister cleanings.
Let water flow guide your schedule. If the output is noticeably weaker than usual, the spray bar holes are clogged, or the filter becomes louder, inspect it sooner. Clean intake strainers every 1 to 2 weeks, since removing surface debris there can restore flow without disturbing the canister media.
When to Call a Pro or Replace
Contact an aquarium service professional if repeated leaks continue after the gasket is cleaned and seated, if the filter will not prime despite correct setup, or if you are managing a large aquarium where a failed filter could quickly affect valuable livestock. Professional help is also sensible for saltwater reef systems with complex plumbing, reactors, and sump connections.
Replace a canister filter when the motor repeatedly fails to start after impeller cleaning, the housing or valve assembly is cracked, replacement parts are unavailable, or the unit leaks from the body itself. A replacement canister filter for a small to mid-size aquarium commonly costs about $70 to $150. For example, a PONDFORSE external canister filter is listed around $70, while a Fluval 207 is around $150. Compare aquarium size rating, hose connection size, media capacity, cabinet clearance, and replacement-part availability rather than choosing by price alone.
FAQ
Can I clean a canister filter without changing aquarium water?
Yes, but save a bucket of tank water first for rinsing the media. A partial water change is convenient because it provides this water and removes waste at the same time, but it is not mandatory.
Should I turn off the heater while cleaning the canister filter?
If the water level will fall below the heater’s minimum water line, unplug the heater first. Let it cool for about 10 to 15 minutes before exposing it to air, then fully submerge it again before turning it back on.
Why is my canister filter still noisy after cleaning?
Noise usually comes from trapped air, a dirty or damaged impeller, a misseated impeller cover, or an air leak around the gasket or hose connections. Re-prime the filter, check the O-ring, and make sure the intake line remains fully submerged.
Do I need to replace ceramic rings or biological media?
Usually, no. Quality biological media can last for years. Replace it only if it is crumbling, badly clogged beyond a gentle rinse, or damaged. If replacement is needed, change no more than about one-third to one-half at a time so the remaining media can support the bacteria colony.
Ready to decide? Our #1 pick for 2026 is the Clean bucket, 3 to 5 gallons.
Live price & availability on Amazon.
Related Reviews & Guides
Best 55 Gallon Aquarium Background 2026

5 Best Floating Aquarium Plants (2026)