Last Updated: October 4, 2026
Replacing aquarium filter media is simple, but doing it too aggressively can disrupt the biological filtration your fish depend on. Beneficial bacteria live on sponge, ceramic, floss, and other media, converting toxic ammonia into less harmful compounds. If you remove every piece at once, rinse media under chlorinated tap water, or leave the filter off too long, ammonia and nitrite can rise quickly. Fish may become lethargic, gasp at the surface, or develop irritated gills.
The safest approach is to replace only what is worn out, preserve established media whenever possible, and monitor the water afterward. This guide explains how to replace aquarium filter media in 2026, whether you use a hang-on-back filter, internal filter, canister filter, or sponge filter.
As an Amazon Associate we earn from qualifying purchases at no extra cost to you.


Quick answer: Our top pick in 2026 is the Replacement media that fits your filter — our #1 rated choice. See the full ranked comparison, alternatives and buying advice below.
What You Need
| Item | Why | Optional? |
|---|---|---|
| Replacement media that fits your filter | Matches the filter’s flow path and frame. Sponge pads, cartridges, ceramic rings, and filter floss serve different purposes. | No |
| Bucket reserved for aquarium use | Holds removed tank water for rinsing reusable media without exposing it to tap-water chlorine. | No |
| Water conditioner | Removes chlorine and chloramine from replacement water. | No |
| Clean scissors or a media cutter | Trims universal foam or filter floss to fit compartments. | Optional |
| Water-test kit | Checks ammonia, nitrite, nitrate, and pH after the change. | Strongly recommended |
| ALEGI Aquarium Sponge Filter Pad | A reusable foam option for cutting replacement pads or adding extra mechanical and biological filtration. A package may cost about $10. | Optional |
| Tetra Whisper Bio-Bag Large Filter Cartridges, 12 Count | A convenient replacement cartridge option for compatible Tetra Whisper filters. A 12-count package may cost about $15. | Optional |
Before buying, measure the old media’s length, width, and thickness in inches. Also check the filter model number. A cartridge that is only 1 inch too wide may block the lid, bypass the intended flow path, or prevent the motor from priming.
Step-by-Step
1. Identify the media and replacement schedule (5 minutes)
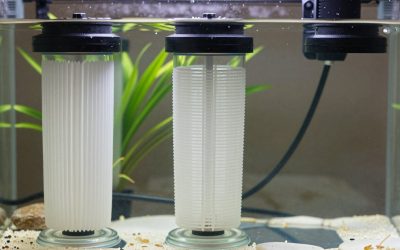
Determine whether you are replacing mechanical, biological, or chemical media. Mechanical media, such as coarse sponge and filter floss, catches solid debris. Biological media, including sponge and ceramic rings, provides surfaces for beneficial bacteria. Chemical media, such as activated carbon, removes certain dissolved compounds but is usually replaced more often.
Read the filter manual or inspect the existing arrangement. Take a quick photo before opening the filter so each layer goes back in the correct order. In most filters, water should encounter coarse mechanical media first, followed by finer mechanical material, biological media, and optional chemical media.
2. Prepare replacement water and a rinse bucket (5 minutes)
Fill a clean bucket with water removed during a routine water change. Do not use a bucket that has held soap, bleach, detergent, or household chemicals. If you need additional water, treat it with aquarium water conditioner according to the product label.
Match the new water as closely as practical to the aquarium’s temperature. A difference of about 2 degrees Fahrenheit is a reasonable target for most tropical community aquariums. Avoid making a large water change solely to replace media unless testing shows a water-quality problem.
3. Turn off and unplug the filter (2 minutes)
Unplug the filter, heater, and any equipment that could run dry during the process. Keep the filter motor off while the housing is open. Never reach into the aquarium or handle wet equipment with dry hands near an active electrical outlet.
If the filter will be off for more than a few minutes, keep biological media submerged in aquarium water. Do not seal it in an airtight container; bacteria need oxygen. For a canister filter, close the valves before disconnecting the hoses to limit spills.
4. Remove and inspect the old media (5 minutes)
Lift out the cartridge, pad, basket, or loose media. Look for torn foam, collapsed floss, excessive sludge, cracked ceramic pieces, or carbon that has been in service beyond its useful period. A dirty appearance alone does not mean biological media is bad. Brown or tan growth is often a sign that it is established.
If the media is only clogged, rinse it gently in the bucket of aquarium water. Squeeze sponge once or twice rather than scrubbing it until it looks new. Replace media when it is falling apart, permanently compressed, chemically exhausted, or impossible to rinse without restricting flow.
5. Replace media gradually when possible (10 minutes)
For a large sponge, biological block, or cartridge containing biological material, replace no more than one-half of that type of media at a time. Leave the rest in place for at least two to four weeks so bacteria can colonize the new material.
If the filter uses a disposable cartridge, you can often cut the old cartridge’s usable sponge or mesh section away from its frame and place it beside the new cartridge temporarily. Another option is to put a piece of established sponge behind or next to the new media, provided it does not block the water path.
Do not replace all biological media and all mechanical media on the same day unless the old material is contaminated, disintegrating, or otherwise unsafe. Gradual replacement is especially important in small aquariums, heavily stocked tanks, and tanks less than six weeks old.
6. Install the new media in the correct order (5 minutes)
Fit the replacement snugly, but do not pack foam or floss so tightly that water must force its way around the edges. Water bypassing the media defeats filtration and can increase noise. If cutting a universal sponge, trim it slightly larger than the compartment only if the filter manufacturer’s design allows compression without bowing the lid.
Keep carbon or other chemical media in a mesh bag or cartridge. Do not add loose carbon directly to a pump chamber. Check that the impeller, intake tube, and overflow slots are clear before closing the housing.
7. Restart the filter and check the flow (5 minutes)
Reconnect hoses, fill the filter with aquarium-safe water if it is not self-priming, and plug it in. Confirm that water is moving steadily through the media and returning to the aquarium. Listen for grinding, rattling, or a loud air pocket. If the filter does not start within a few seconds, unplug it and follow the manufacturer’s priming instructions rather than allowing the motor to run dry.
Check for leaks around the lid, seals, clips, and hose connections. Verify that the return flow is not so strong that fish struggle to swim or the substrate is being displaced.
8. Test the aquarium water (10 minutes, plus follow-up)
Test ammonia and nitrite within 24 hours of a substantial media change, then test again over the next several days. In a cycled aquarium, both should generally read 0 parts per million. If either is detectable, perform a partial water change with conditioned, temperature-matched water and reduce feeding temporarily.
For a new, heavily stocked, or biologically unstable aquarium, test daily for several days. Avoid adding more fish until ammonia and nitrite remain at 0 parts per million.
Mistakes to Avoid
- Replacing everything at once: This can remove much of the established biological filtration.
- Using untreated tap water: Chlorine and chloramine can damage beneficial bacteria.
- Cleaning media with soap: Even a small residue can harm fish and invertebrates.
- Rinsing until spotless: Mechanical media needs cleaning, but biological media should retain some established growth.
- Installing media backward: Follow the filter’s intended water-flow direction.
- Overstuffing the compartment: Restricted flow can cause overflow, noise, or motor strain.
- Replacing carbon automatically: Carbon is optional in many tanks and is not a substitute for biological filtration.
- Ignoring water tests: Clear water can still contain harmful ammonia or nitrite.
How Often
Rinse coarse sponge media when the filter flow noticeably slows, often every two to eight weeks. Fine floss may need replacement weekly or every few weeks, depending on stocking, feeding, and debris. Biological sponge and ceramic media may last for years if they remain intact and are rinsed gently.
Replace activated carbon according to its packaging, commonly every two to four weeks. Replace disposable cartridges when the frame or media deteriorates, but consider adding a permanent sponge so routine cartridge changes do not remove all biological capacity. Your aquarium’s filter flow, water tests, and livestock behavior are better guides than a fixed calendar.
When to Call a Pro or Replace
Ask an experienced aquarium professional for help if fish are gasping, multiple fish become ill, ammonia or nitrite remains elevated after partial water changes, or you are unsure whether a medication or chemical has contaminated the media. Seek help promptly after a power outage lasting many hours, especially if the filter media dried out or became foul-smelling.
Replace the filter rather than only its media if the motor repeatedly fails, the impeller is cracked, the housing leaks, electrical components get wet, or replacement parts are unavailable. A filter that cannot maintain steady flow is not reliable biological support.
FAQ
Can I replace aquarium filter media while fish are in the tank?
Yes. Turn off the equipment, work carefully, and avoid stirring the substrate. Keep reusable biological media wet in aquarium water, then restart the filter as soon as the new media is installed.
Should I replace the sponge and cartridge at the same time?
Usually, no. Replace one type first and leave established biological media in place for two to four weeks. This reduces the chance of an ammonia or nitrite spike.
How do I know whether filter media is dirty or worn out?
If water still flows normally and the media remains intact, rinse it gently in removed aquarium water. Replace it when it tears, collapses, sheds material, stays severely clogged, or can no longer be cleaned enough to restore proper flow.
What should I do if ammonia rises after replacement?
Test ammonia and nitrite, perform a partial water change with conditioned water, reduce feeding, and avoid replacing additional biological media. Keep the filter running continuously and test daily until both readings return to 0 parts per million.
Ready to decide? Our #1 pick for 2026 is the Replacement media that fits your filter.
Live price & availability on Amazon.
Related Reviews & Guides
5 Best Betta Tank Decor (2026)
13 Best Aquarium Lights: Top Picks Reviewed and Compared (2026)