Last Updated: October 4, 2026
A canister filter quietly handles a large share of an aquarium’s mechanical, biological, and chemical filtration. But when it becomes clogged, flow drops, water turns cloudy, and the motor can run hot. Cleaning it incorrectly can be just as damaging: tap water may kill beneficial bacteria, mixing up media can reduce filtration, and a dry or poorly seated gasket can cause leaks. This guide explains how to clean an aquarium canister filter safely while preserving as much of the biological filter as possible. Set aside about 30 to 45 minutes for a routine cleaning, or longer if the hoses and impeller are heavily fouled.
Quick answer: Our top pick in 2026 is the Two clean buckets — our #1 rated choice. See the full ranked comparison, alternatives and buying advice below.
What You Need
| Item | Why | Optional? |
|---|---|---|
| Two clean buckets | One holds removed aquarium water for rinsing media; the other can catch drips or hold parts. | No |
| Dechlorinated aquarium water | Protects beneficial bacteria during rinsing. Water removed during a water change is ideal. | No |
| Old towels | Canister filters, hoses, and quick-disconnect fittings often retain water. | No |
| Soft brush or toothbrush | Cleans the impeller well, intake strainer, valves, and fittings without scratching plastic. | No |
| Filter floss or replacement sponge | Replaces media that is torn, collapsed, or permanently clogged. | Yes |
| Silicone aquarium lubricant | Helps condition O-rings and the main lid gasket. Use only a product labeled aquarium-safe. | Yes |
| Hose-cleaning brush | Removes the dark film that builds inside long intake and return hoses. | Yes |
| Replacement impeller or gasket | Useful if the filter still rattles, leaks, or has weak flow after cleaning. | Yes |
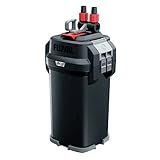
Canister filters vary in basket layout and locking mechanisms, so check the manufacturer’s diagram before removing parts. Current examples range from budget units around $70 to larger, more established models near $150, such as the PONDFORSE Canister Filter at about $70 and the Fluval 207 Performance Canister Filter at about $150. Price is not a substitute for matching the filter to your aquarium’s size, hose diameter, and required flow rate.
As an Amazon Associate we earn from qualifying purchases at no extra cost to you.

Step-by-Step
-
Prepare the work area and aquarium water — 5 minutes
Turn off feeding a few hours before cleaning if possible. Place towels beneath the filter and prepare a bucket with water removed from the aquarium during a water change. If you are not doing a water change, use clean water treated with aquarium dechlorinator and brought close to the aquarium’s temperature. Do not use untreated tap water for biological media.
-
Unplug the filter and secure the hoses — 2 minutes
Unplug the canister filter before closing or disconnecting anything. Close the intake and return valves, if your model has them, then release the quick-disconnect block or hose fittings. Keep the intake and return ends above the water line while you work. Never allow a pump to run dry, even briefly, because the impeller and motor may overheat.
-
Move the canister to a protected surface — 2 minutes
Lift the filter upright rather than tilting it across the floor. Many canisters hold several quarts of water after shutdown. Keep the unit level to reduce spills and place it in a sink, shower, or large plastic tub if available. Photograph the hose connections and media arrangement before opening the lid.
-
Open the housing and inspect the media — 5 minutes
Release the clips or locking ring evenly and lift off the motor head. Remove the baskets one at a time, keeping their order intact. Mechanical media, such as coarse foam and filter floss, usually catches the most debris and may require the most attention. Biological media, including ceramic rings or porous blocks, should not look factory-clean; its rough, coated surface is where useful bacteria live.
-
Rinse reusable media in old aquarium water — 5 to 10 minutes
Swish sponges and other reusable media gently in the bucket. Squeeze foam underwater only until loose debris falls away. Do not scrub biological media aggressively or rinse every basket until the water runs clear. Replace filter floss when it is packed solid, falling apart, or still restricting flow after rinsing. Replace only a portion of biological media at a time so the aquarium retains established bacteria.
-
Clean the impeller and impeller well — 5 minutes
Remove the motor head’s impeller cover according to the manual. Pull out the magnetic impeller and ceramic shaft carefully. Rinse the parts in aquarium water, then use a soft brush to remove slime from the impeller blades, shaft, rubber end caps, and the small cavity where the impeller sits. Do not force a stuck impeller with a metal tool. A damaged shaft or chipped magnet can cause vibration and poor flow.
-
Flush the hoses and fittings — 5 to 10 minutes
Inspect the intake strainer, spray bar, valves, and hose ends. Use a hose brush or a strong stream of dechlorinated water to remove buildup inside the tubing. A thick internal film can reduce water movement even when the baskets look clean. Check that every connector is free of sand, plant debris, and gravel. Do not use soap, household cleaner, bleach, or scented disinfectant.
-
Check the seals and reassemble the canister — 5 minutes
Wipe the lid gasket and its groove with a clean, damp cloth. Look for flattening, cracks, or twists. Apply a very thin film of aquarium-safe silicone lubricant if the gasket is in good condition; lubricant is not a repair for a damaged seal. Reinstall the baskets in their original order, ensure media trays sit flat, and close the lid evenly. Over-tightening clips can distort the housing or gasket.
-
Reconnect, prime, and test for leaks — 5 minutes
Reconnect the hoses and open the valves before plugging in the filter. Prime it using the built-in primer or the manufacturer’s recommended method. The canister should fill with water before the motor runs continuously. Plug it in and listen for steady operation. A brief burbling sound is common while air leaves the hoses, but persistent rattling suggests trapped air, a loose connection, or an impeller problem. Watch every fitting and the lid for at least five minutes.
-
Restore normal aquarium operation — 2 minutes
Confirm that water is returning at a steady rate and that the intake is not pulling in air. Reposition the spray bar or outlet if necessary. Dispose of dirty rinse water away from household drains if it contains gravel or plant debris. Record the cleaning date and any parts replaced so you can spot changes in flow over time.
Mistakes to Avoid
- Using hot, chlorinated, or soapy water: Chlorine and chloramine can damage beneficial bacteria, while soap residue can harm fish.
- Replacing every type of media at once: This can remove much of the established biological filtration. Stagger replacements whenever possible.
- Cleaning only the baskets: A clogged impeller well, intake strainer, or hose can be the real cause of weak flow.
- Running the canister dry: Always prime the housing and confirm water movement before leaving the filter unattended.
- Ignoring the gasket: A twisted, dirty, or cracked O-ring is a common cause of slow leaks.
- Over-cleaning: If flow is normal and the aquarium is stable, an unnecessary deep cleaning can disturb the biological balance.
How Often
For most freshwater aquariums, inspect the filter every two to four weeks and perform a complete routine cleaning about every one to three months. Clean sooner if the return flow drops noticeably, the intake makes unusual noise, the water level in the priming line changes, or the filter produces cloudy water. Heavily stocked tanks, planted tanks with loose debris, and aquariums fed generously may need monthly cleaning. Lightly stocked tanks with prefilters may go closer to three months.
Replace disposable filter floss when it stays clogged after rinsing. Replace foam when it crumbles or loses its shape. Biological ceramic media can last for years if it remains intact and is rinsed gently. Your aquarium’s water tests matter more than a calendar: test ammonia and nitrite after major media replacement or if fish show stress.
When to Call a Pro or Replace
Stop using the filter and seek aquarium-service help if water continues leaking after the gasket and connections are correctly seated, the motor becomes unusually hot, or electrical components are wet. Persistent grinding, repeated priming failure, cracked housing parts, or a burning smell also warrant professional inspection.
Replacing the impeller, O-rings, valves, or hose is usually more practical than replacing the entire canister. Consider a new filter when the housing is cracked, replacement parts are unavailable, the motor repeatedly fails, or the unit no longer provides adequate flow for the aquarium. Before buying, match the replacement’s recommended aquarium capacity, hose size, media volume, and electrical requirements rather than choosing by price alone.
FAQ
Can I rinse a canister filter with tap water?
Use treated aquarium water for biological media whenever possible. Tap water may contain chlorine or chloramine, which can damage beneficial bacteria. A brief tap-water rinse may be acceptable for a detachable intake strainer or empty plastic parts if they are thoroughly treated and rinsed afterward, but never use soap or household cleaners.
Should I clean all the filter media at the same time?
No. Rinse mechanical media as needed, but clean biological media gently and stagger major replacements. Keeping some established media in the filter helps maintain the nitrogen cycle, especially after a deep cleaning.
Why is my canister filter noisy after cleaning?
Most post-cleaning noise comes from trapped air, a loose hose connection, an incorrectly seated impeller, or debris in the impeller well. Confirm that the canister is full of water, gently tilt it according to the manufacturer’s instructions to release air, and inspect the impeller if the noise continues.
How do I know when the filter is clean enough?
The goal is restored flow, not spotless media. Reusable sponges should allow water through, hoses should be visibly open, and the impeller should spin freely. Some brown coating on biological media is normal and beneficial.
Ready to decide? Our #1 pick for 2026 is the Two clean buckets.
Live price & availability on Amazon.
Related Reviews & Guides

Best Aquarium for Axolotl: Top Compared Floor-Space Guide
6 Best Aquarium Water Chillers 2026